Let's learn how to use BLoC efficiently. We will cover the complex ideas about BLoC and how to use them. Some of the BLoC concepts I have covered in BLoC Gym App and Study App.
For starter we will start with three basic concepts for BLoC state management.
With the above three, we would be able to build a complete app that uses BLoC. Everything in a BLoC happens due to the above three things.
Simply speaking
Events carry data from UI to the shared state.
States is the shared storage. It stores data. We can also retrieve data from states.
Events and states together create a machanism called BLoC.
BLoC events
BLoC events are registered in the BLoC classes. They are registered using on method. This method takes an event class as type and a method to be triggered. Each event represents an event class. They are triggered using the add() method.
class WelcomeEvent{}One class could be a just one event. You may have many classes for many events. We will mention them from BLoC class using on method. See the picture below.
BLoC events are like a marker or a sign to do things. When these markers or evetns are called, you do things.
BloC states
Bloc states are for emitting states. Emitting states means, inform the UI that, something has happened. They are triggered from the events methods. States are emitted using emit() function. This function comes from Emitter class.
class WelcomeState {
  int page;

  WelcomeState({this.page = 0});
}
In general states are also classes. Your classes should contain varaible and change the variable value as need. This is called change state.
For changing state you need to create a trigger. In general we call it emit. When we emit a state we change a state.
emit(WelcomeState(page:state.page));This emit() function, you don't have to call it emit. You may call it anything. See the picture below.
BLoC blocs
BLoC blocs are combined of events and states. First you need to have events and states and then you combine in bloc class.
In general you create a new class, and this classs extends BLoC class. And you need to mention your event and state type.
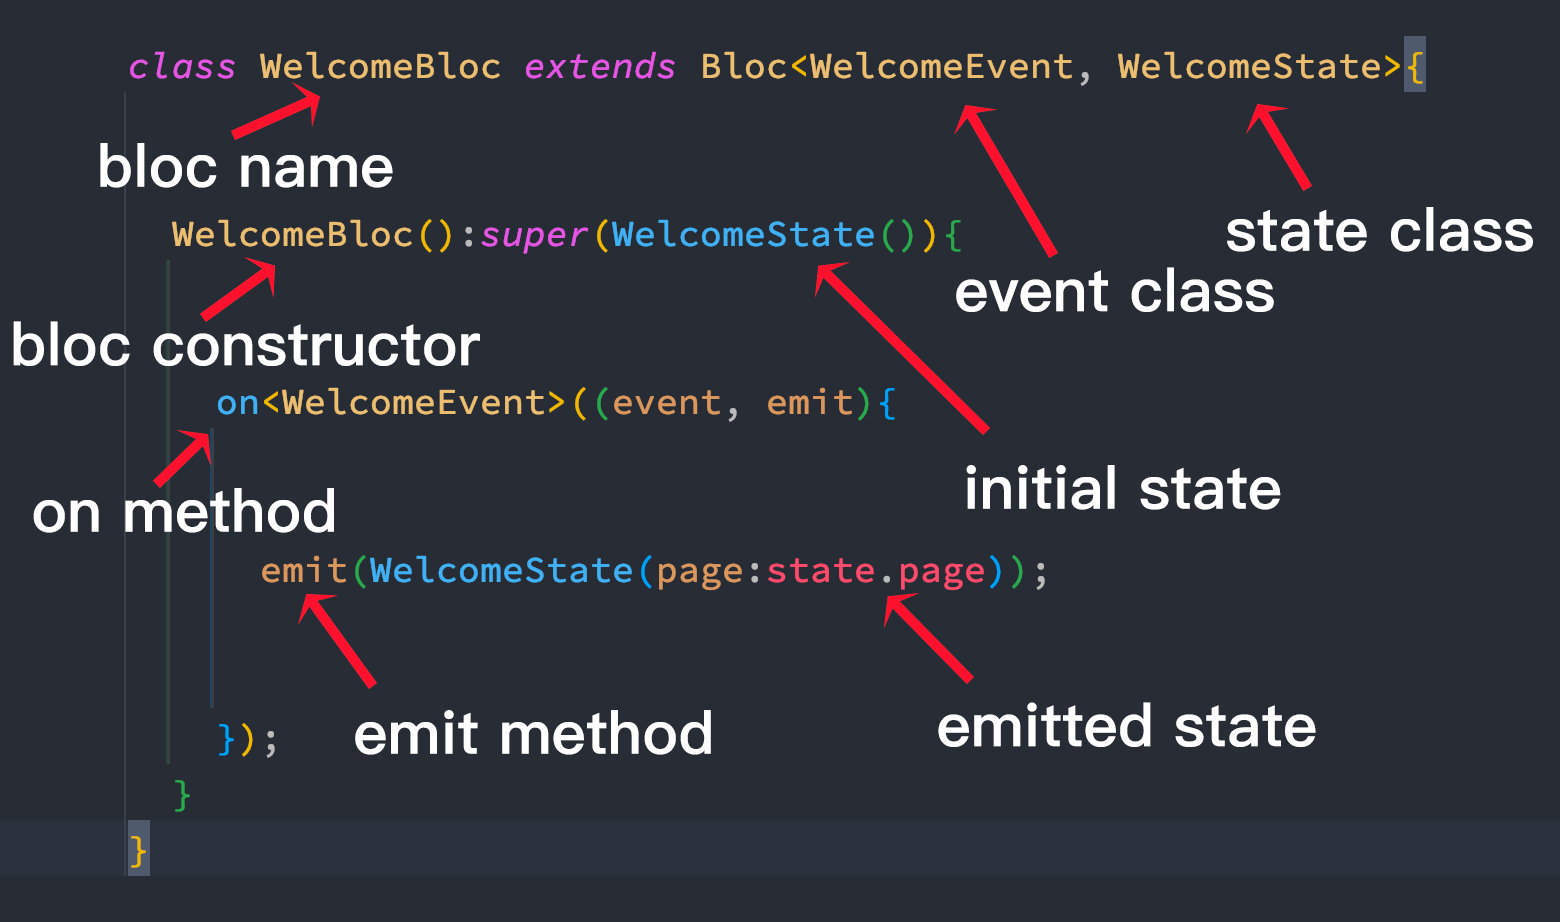
Then you need to initialize your initial state. And then register your events using on method and then emit(trigger) your states.
BloC emitter
An [Emitter] is a class which is capable of emitting new states.
[EventHandler] which has access to an [Emitter].
class WelcomeBloc extends Bloc<WelcomeEvent, WelcomeState> {
  WelcomeBloc() : super(const WelcomeState()) {
    on<PageChanged>(_onPageChanged);

  }

  void _onPageChanged(
      PageChanged event,
      Emitter<WelcomeState> emit,
      ) {
    emit(state.copyWith(page: event.page));
  }

}
We see that our state class WelcomeState is a type in Emitter. And the instance name is emit. Emitter is a callable class. It means we can call this class using function. We use the instance emit to call the class.
RepositoryProvider
You use RepositoryProvider to load data from network, making http request or connecting to cloud messaging and feed the data to BLoC. For this reason first you need to wrap your app in the root level using RepositoryProvider and create repository using your repository class.
In general the child of the RepositoryProvider is a BlocProvider.
RepositoryProvider provides the repository to its children through RepositoryProvider.of(context). When developers create a new RepositoryProvider and that gets available to the rest of the subtree. See an example
class MyApp extends StatelessWidget {
  const MyApp({Key? key}) : super(key: key);

  @override
  Widget build(BuildContext context) {
    return RepositoryProvider(
        create: (context) => DataRepository()..loadPopularProducts(),
        child: BlocProvider(
          create: (context)=>AppBlocs(
            dataRepo:RepositoryProvider.of<DataRepository>(context)
          ),
          child: MaterialApp(
            home: HomePage(),
          ),
        ),
    );
  }
}
BlocProvider
Just RepositoryProvider, BLocProvider also takes a BLoC(a class that has events and states) and creates BLoC out of it(I know it's confusing).
BlocProvider provides the bloc to its children through BlocProvider.of(context). In most cases, developers create a new BlocProvider and that gets available to the rest of the subtree.
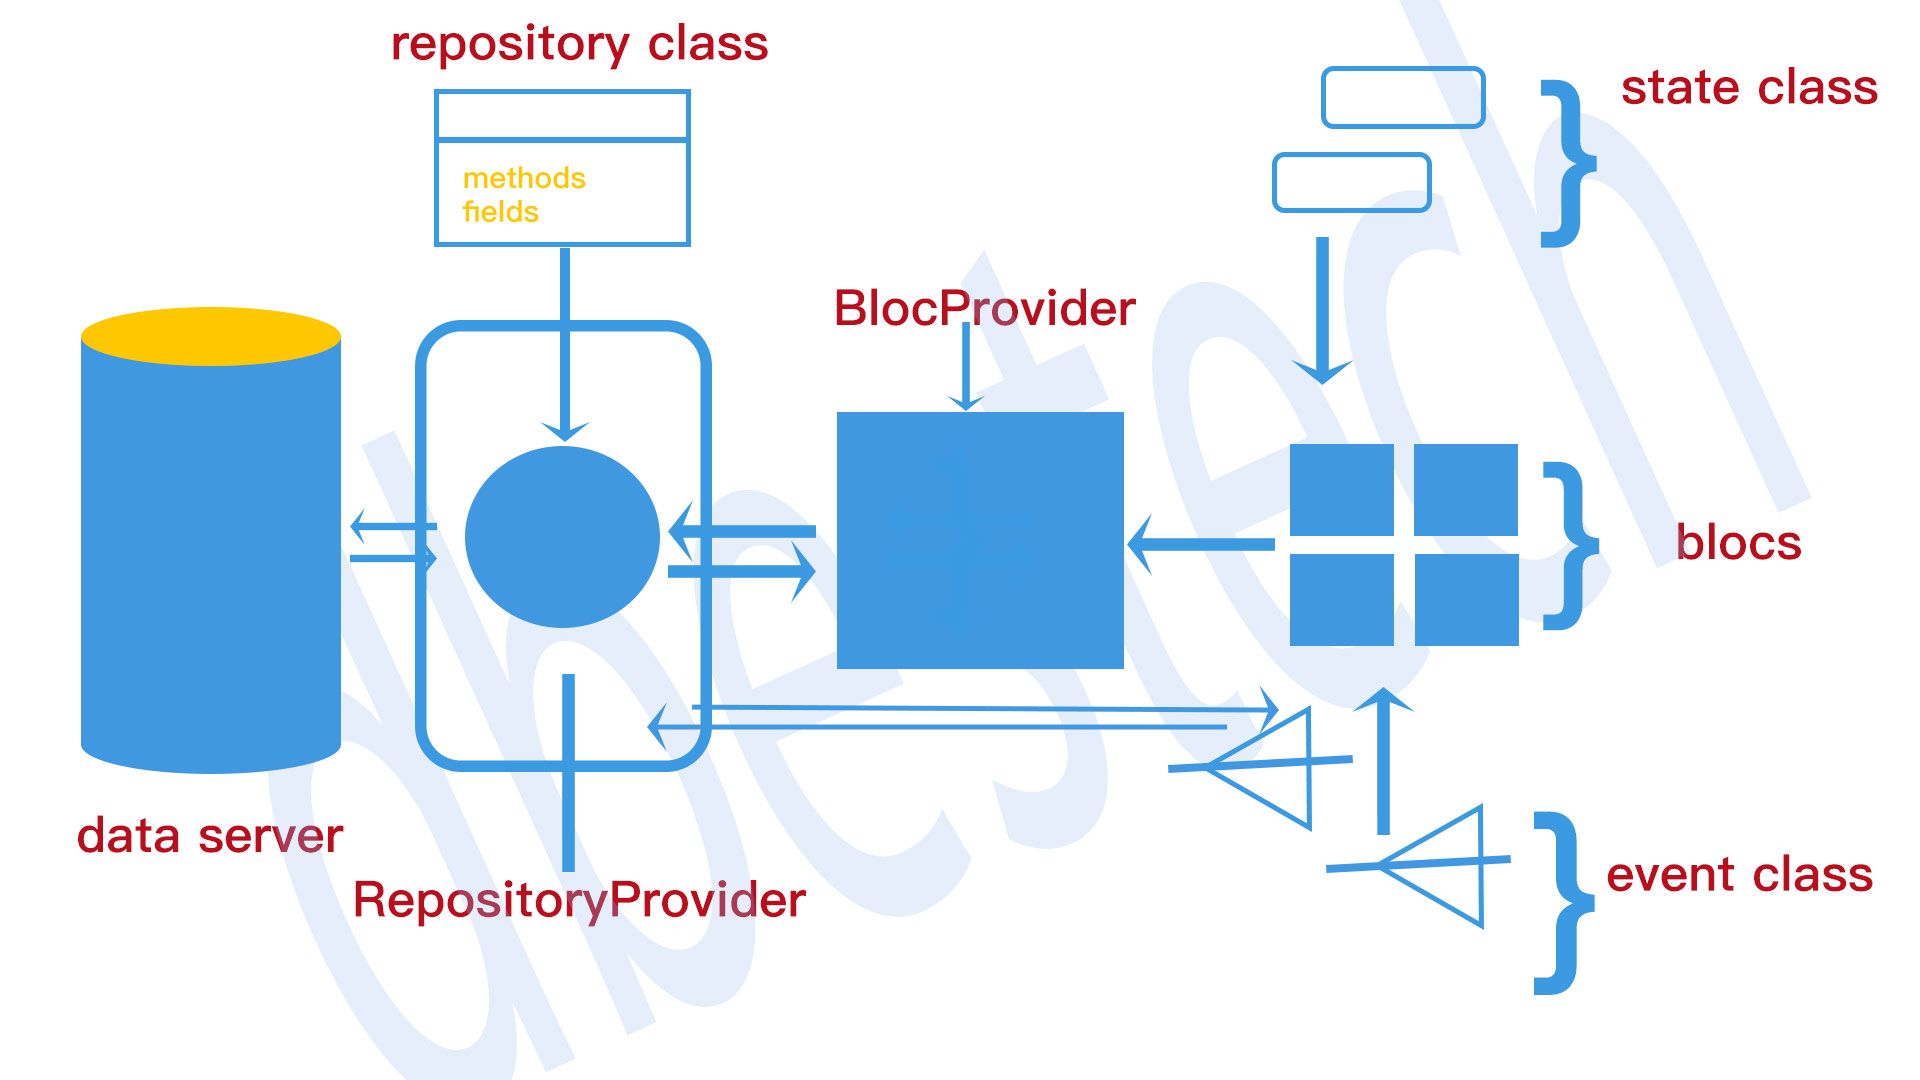
If you have the video you know that,
See an example
class MyApp extends StatelessWidget {
  const MyApp({Key? key}) : super(key: key);

  @override
  Widget build(BuildContext context) {
    return RepositoryProvider(
        create: (context) => DataRepository()..loadPopularProducts(),
        child: BlocProvider(
          create: (context)=>AppBlocs(
            dataRepo:RepositoryProvider.of<DataRepository>(context)
          ),
          child: MaterialApp(
            home: HomePage(),
          ),
        ),
    );
  }
}
MultiBlocProvider
If you have a lot of BlocProviders, your code would be unmaintainable. It's better you put them all of your BlocProviders and MultiBlocProvider.
MultiBlocProvider has a provider property which takes a a list of providers.
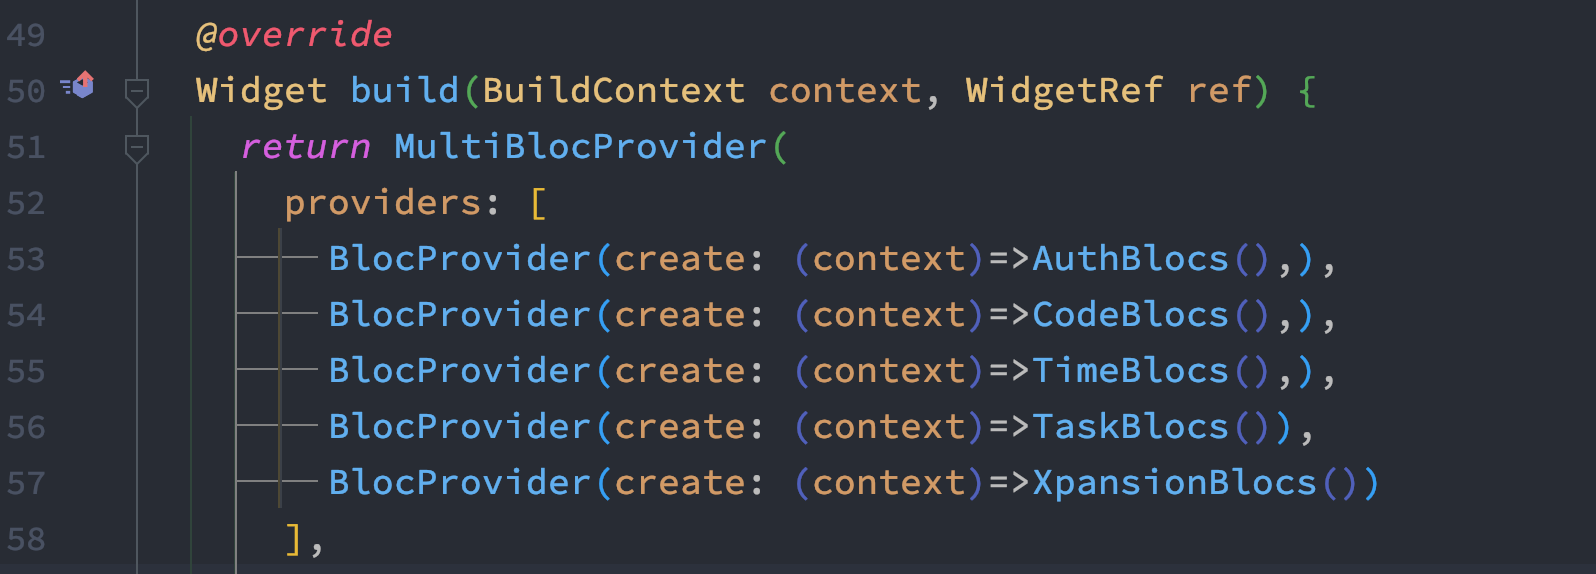
BLoC List of Providers
Let's see how to work with this.
If you have BlocProviders are in a seperate class and inside a List,
  static List<PageEntity> Routes(){
    return [
      PageEntity(
          path:AppRoutes.INITIAL,
          page:Welcome(),
          bloc:BlocProvider(create: (_) => WelcomeBloc())
      ),
      PageEntity(
          path:AppRoutes.Sign_in,
          page:SignIn(),
          bloc:BlocProvider(create: (_) => SignInBloc())
      ),
      PageEntity(
          path:AppRoutes.Register,
          page:Register(),
          bloc:BlocProvider(create: (_) => RegisterBloc())
      ),

      PageEntity(
          path:AppRoutes.Lesson,
          page:Lesson(),
          bloc:BlocProvider(create: (_) => LessonBloc())
      ),
      PageEntity(
          path:AppRoutes.VideoCall,
          page:VideoCall(),
          bloc:BlocProvider(create: (_) => VideoCallBloc())
      ),


    ];
  }
See how we created a lot of routes like Getx and injected our BlocProvider. So above Routes() function returns a list of Routes with certain BLoC.
Then we created a new List in the below function and return
  static List<dynamic> Blocer(BuildContext context){
    List<dynamic> blocerList = <dynamic>[];
    for(var blocer in Routes()){
      blocerList.add(blocer.bloc);
    }
    return blocerList;
  }
The returned Blocs could be injected inside MultiBlocProvider
MultiBlocProvider(
        providers: [...AppPages.Blocer(context)],
        child: ScreenUtilInit(
            designSize: Size(375, 812),
            builder: (context, child) => MaterialApp(
              title: 'ulearning',
              theme: AppTheme.light,
              debugShowCheckedModeBanner: false,
              navigatorObservers: [AppPages.observer],
              initialRoute: AppRoutes.INITIAL,
              onGenerateRoute: AppPages.GenerateRouteSettings,
            ))
    );
AppPages.Blocer(context), inject all the BlocProvider inside MultiBlocProvider.
BLoC Routing
BLoC could also be used for routing. But one may disagree that, we must use BLoC for seperating the business logic from UI.
Personally I think it's not gonna hurt the performance and add extra code in your lib. On the other hand, if you use a plugin to do it, you will have a lot of extra code. And version control is also a problem. In face there are not good routing plugins out there apart from go_router and Getx routing.
Some people don't wanna use Getx and go_routing is not complete yet. So I dedcided to go ahead with on BLoC routing.
The steps we followed to do this
BLocObserver
Here we will learn how to use BlocObserver of bloc pattern to debug your app states and events. With this you may keep track of your app states and events that are triggers. BlocObserver gives you a few methods like onEvent(), onTransition() and onChange().
To be able to use you need to override them.They all get called in the order I have written.
All these methods get called before updating any states. onTransition and onChange both consist of currentState and nextState. But onTransition also tells you which event could case the next state change. This is cool for debugging.
The video tutorial is based on an earlier bloc tutorial. Get the code if you want to follow exactly as me. And here's the code for BlocObserver
import 'package:flutter/cupertino.dart';
import 'package:flutter_bloc/flutter_bloc.dart';

class MyGlobalObserver extends BlocObserver {
  @override
  void onEvent(Bloc bloc, Object? event) {
    super.onEvent(bloc, event);
    debugPrint('${bloc.runtimeType} $event');
  }
  @override
  void onTransition(Bloc bloc, Transition transition) {
    super.onTransition(bloc, transition);
    debugPrint('${bloc.runtimeType} $transition');
  }

  @override
  void onChange(BlocBase bloc, Change change) {
    super.onChange(bloc, change);
    debugPrint('${bloc.runtimeType} $change');
  }

  @override
  void onError(BlocBase bloc, Object error, StackTrace stackTrace) {
    debugPrint('${bloc.runtimeType} $error $stackTrace');
    super.onError(bloc, error, stackTrace);
  }
}
And don't forget to do add the class in your BlocOverrides object like below
void main() {
  BlocOverrides.runZoned(
        () {
      runApp(const MyApp());
    },
    blocObserver: MyGlobalObserver(),
  );
}
BLoC Lazy Loading
There are times you want to load some blocs in certain order and give priority. We can do it easily with BLoC package.
Each BlocProvider has a property called lazy. The default value is true, this means that you load the bloc lazily. If you never mention lazy to false then all the blocs would be loaded lazily if you have MultiBlocProvider.
And with default settings, it's memory efficient. And certain bloc is loaded into the memory if you use or find the bloc using BlocProvider.of<BlocName>(context).stateName
You may also look up the blocs using context.read<BlocName>.stateName
If you set lazy to false, this certain bloc would be loaded into the memory immediately as soon as your app runs.
If you set all your BlocProvider's property lazy to false, all of the them would be immediately loaded into the memory.
See an example
MultiBlocProvider(
      providers: [
        BlocProvider(
            lazy: false,
            create: (context) => WelcomeBloc()
        ),
        BlocProvider(
            lazy: false,
            create: (context) => AppBlocs()
        ),
      ],
    child:.....
)
Like this all the blocs would be loaded immediately. The BlocProvider you place first that would be in first place, seconed one be created in second place. and like that.
Separating BlocProviders
If you have too many BlocProviders, it's better you put the BlocProviders in a separate file. This way your code looks cleaner and all the Providers are together.

In the above picture, all of my BlocProviders are injected inside MultiBlocProvider. Let's separate them.
Just create a new dart file and create a class, inside the class, create a static getter. This getter must return a List.
class AppBlocProviders{
  static get allBlocProviders=>[
    BlocProvider(lazy: false, create: (context) => WelcomeBloc()),
   // BlocProvider(lazy: false, create: (context) => AppBlocs()),
    BlocProvider(create: (context)=>SignInBloc()),
    BlocProvider(create: (context)=>RegisterBlocs()),
  ];
}
Since we have a static getter allBlocProviders, we can call this from main.dart inside MultiBlocProvider

You see, with this, our code looks much cleaner.
BLoC abstract class
In general, you should have an abstract class in your event, and you should extend that abstract class. And that sub-class is used for event trigger from UI.
So that means you have to have one abstract class and one sub-class.

At the same time, in your class where you extend the Bloc class, you need to pass a constructor from your sub-class. The sub-class constructor must not be const, otherwise you will get error.
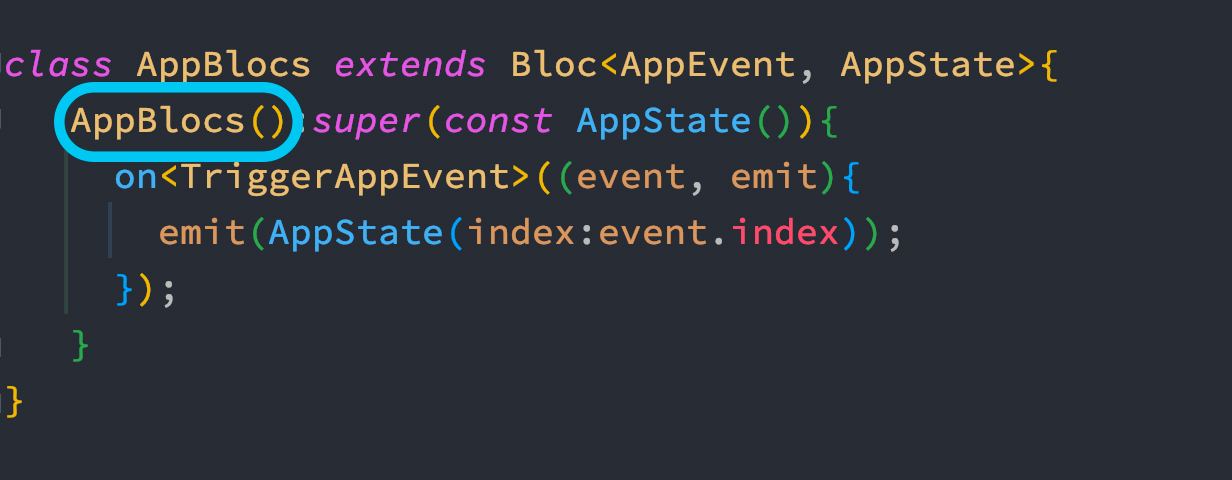
You see from the above picture, we circled the class, you must not put a const there.
BLoC RefreshIndicator
If you use Flutter BLoC to do restful API call, need you need to integrate refresh indicator widget with BLoC API.
To do it, you need to find a suitable place, where you call api and populate your UI data.
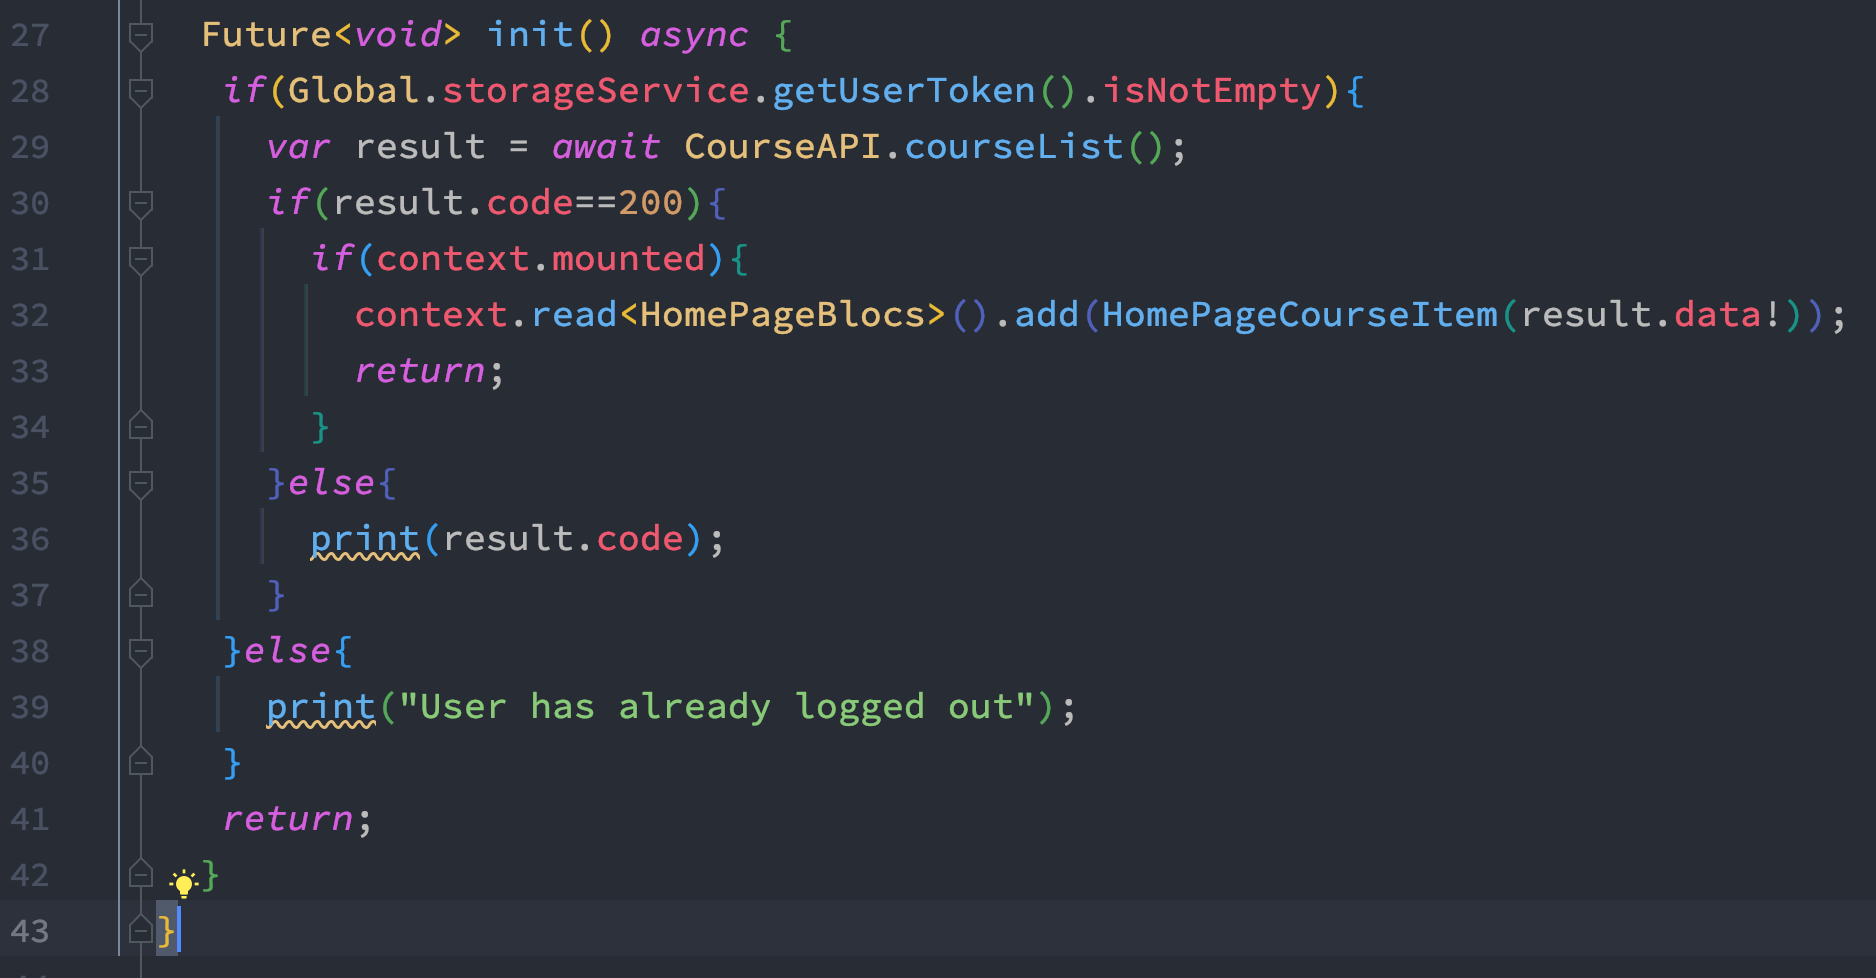
We use init() method to access restful api and trigger events when we are done loading. In our case HomePageBlocs trigger events and pass down the loaded data to the BLoC state class.
Then on the UI, we use RefreshIndicator widget to refresh the UI on pull down. Initially refresh indicator looks like this
RefreshIndicator(
        onRefresh: (){

})
So inside onRefresh() callback, we will call our init() method and return it.
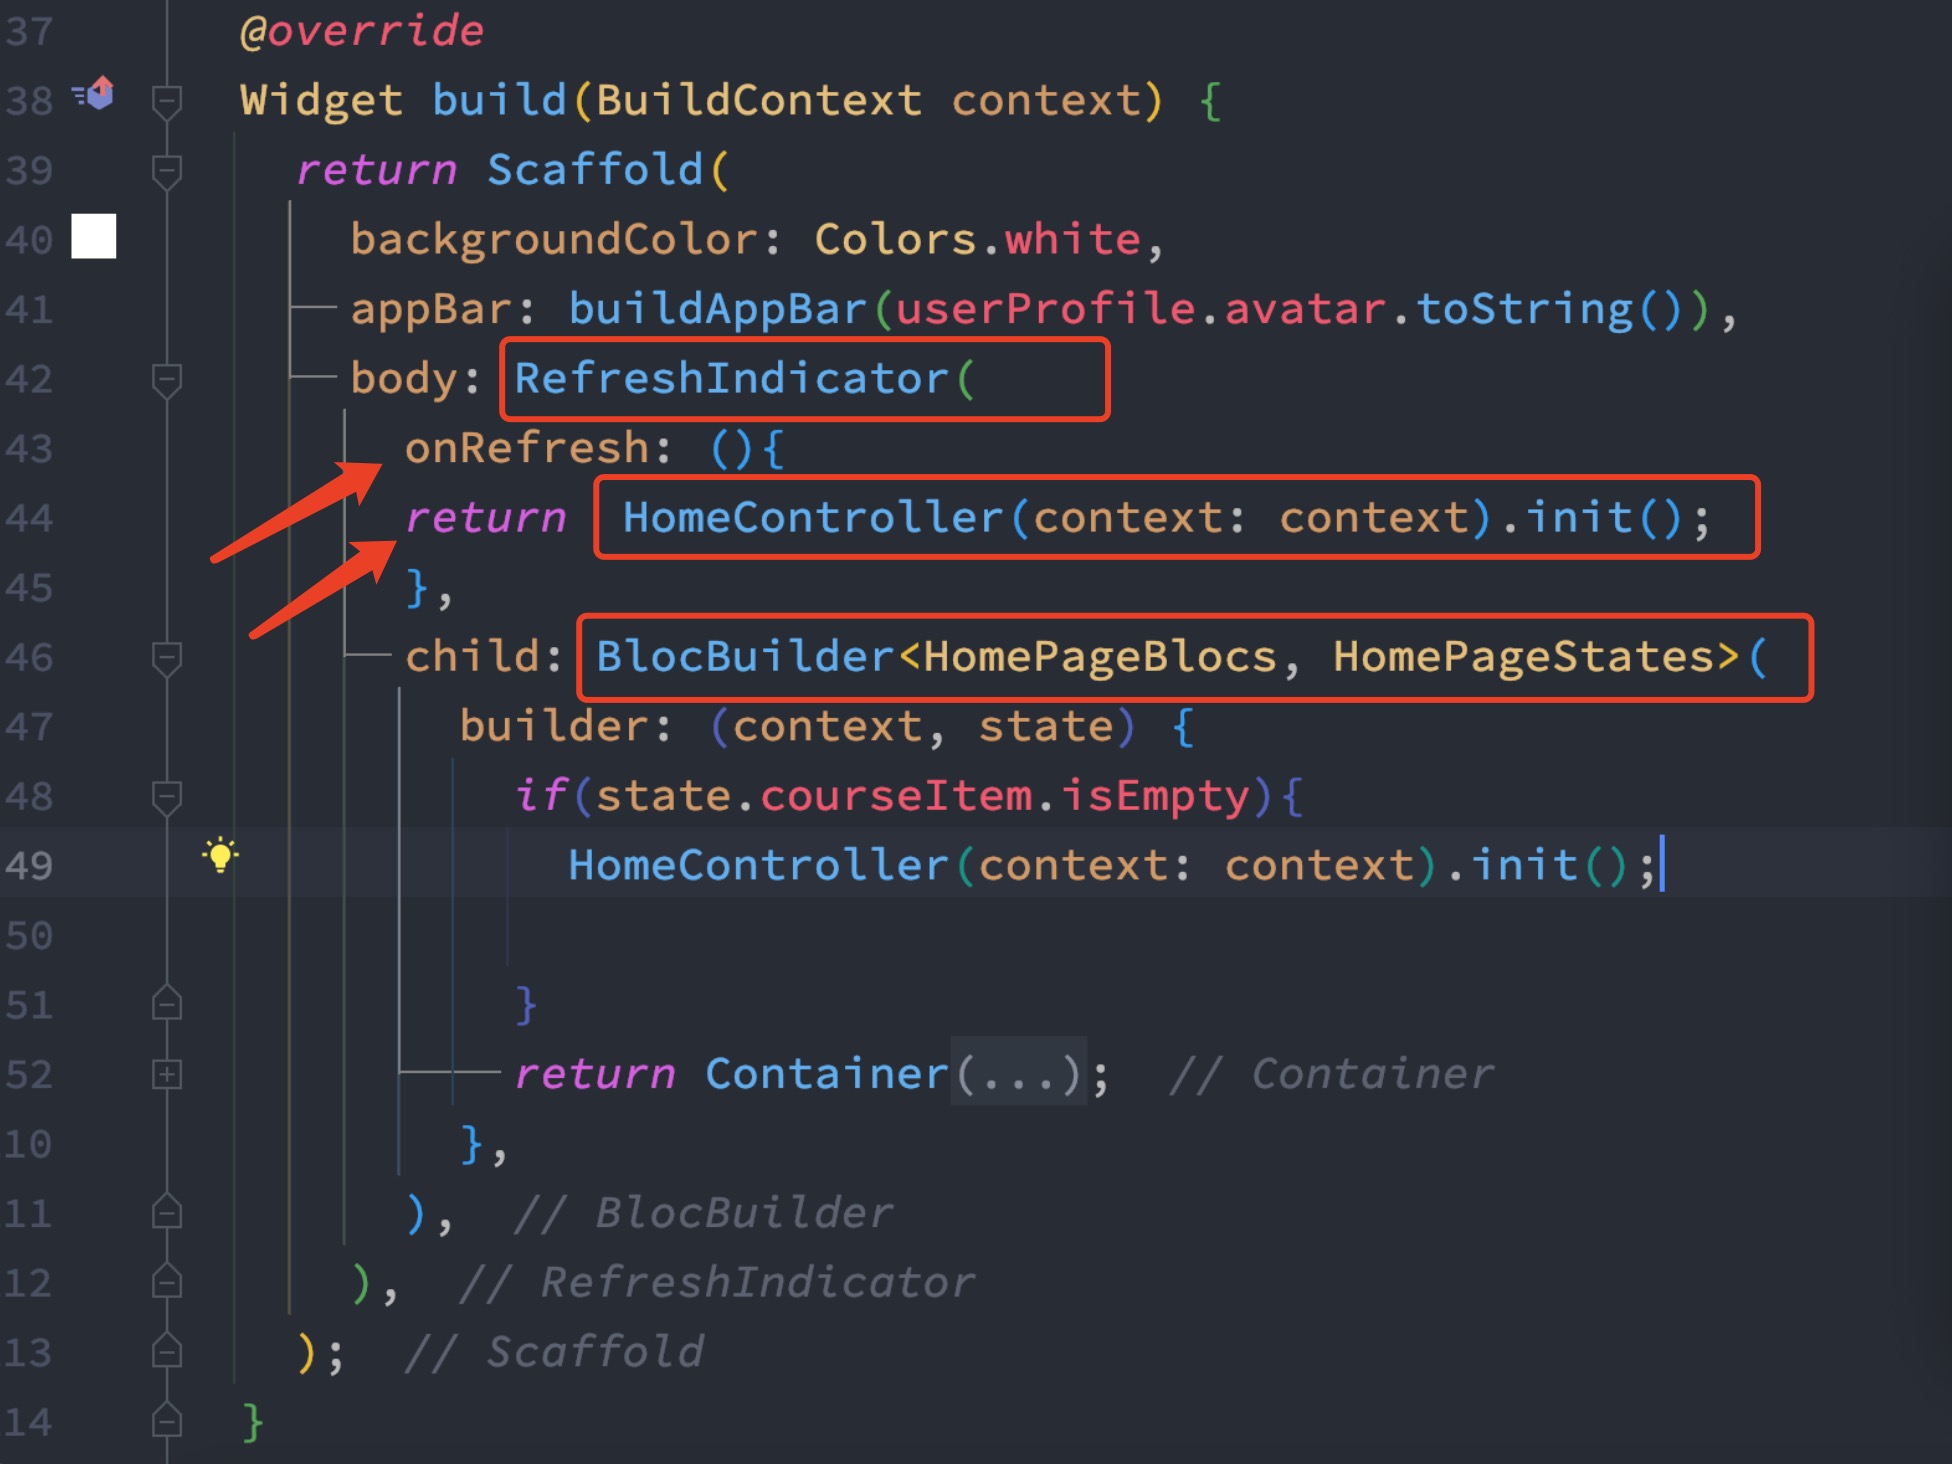
But you need to make sure you have a return statement inside init() function.
BLoC Add Data To List
Here we will briefly take a look how we can add data to a List. We will see it about using custom data type.

From the above picture, how we are adding data to list. To update the List, first on line 24, we the all the items from the current List. Then we added the data in the list on line 25, we get the data from the event. Event get us the data from the UI element and then on line 26 we triggered the event.
That also means we stored the data in our List.
Simply speaking
More about BLoC CRUD and you may also get the complete code task management.
......coming more.....