Riverpod 2.0 has big changes then the earlier versions. It introduced auto generated providers which is convenient and less error prone. It has also introduced two new providers NotifierProvider and AsyncNotifierProvider.
Look at the index of this tutorial. If you click the below link, they will take you to the corresponding links. Many of these links stay in this page. Since Riverpod is huge topic, some links will take you to other pages.
Annotation and code generation
Annotation and code generation
It also introduced annotation and Riverpod code generator. Without annotation it would not generate code you. Make sure you import the code generation package at the top which will find the annotation.
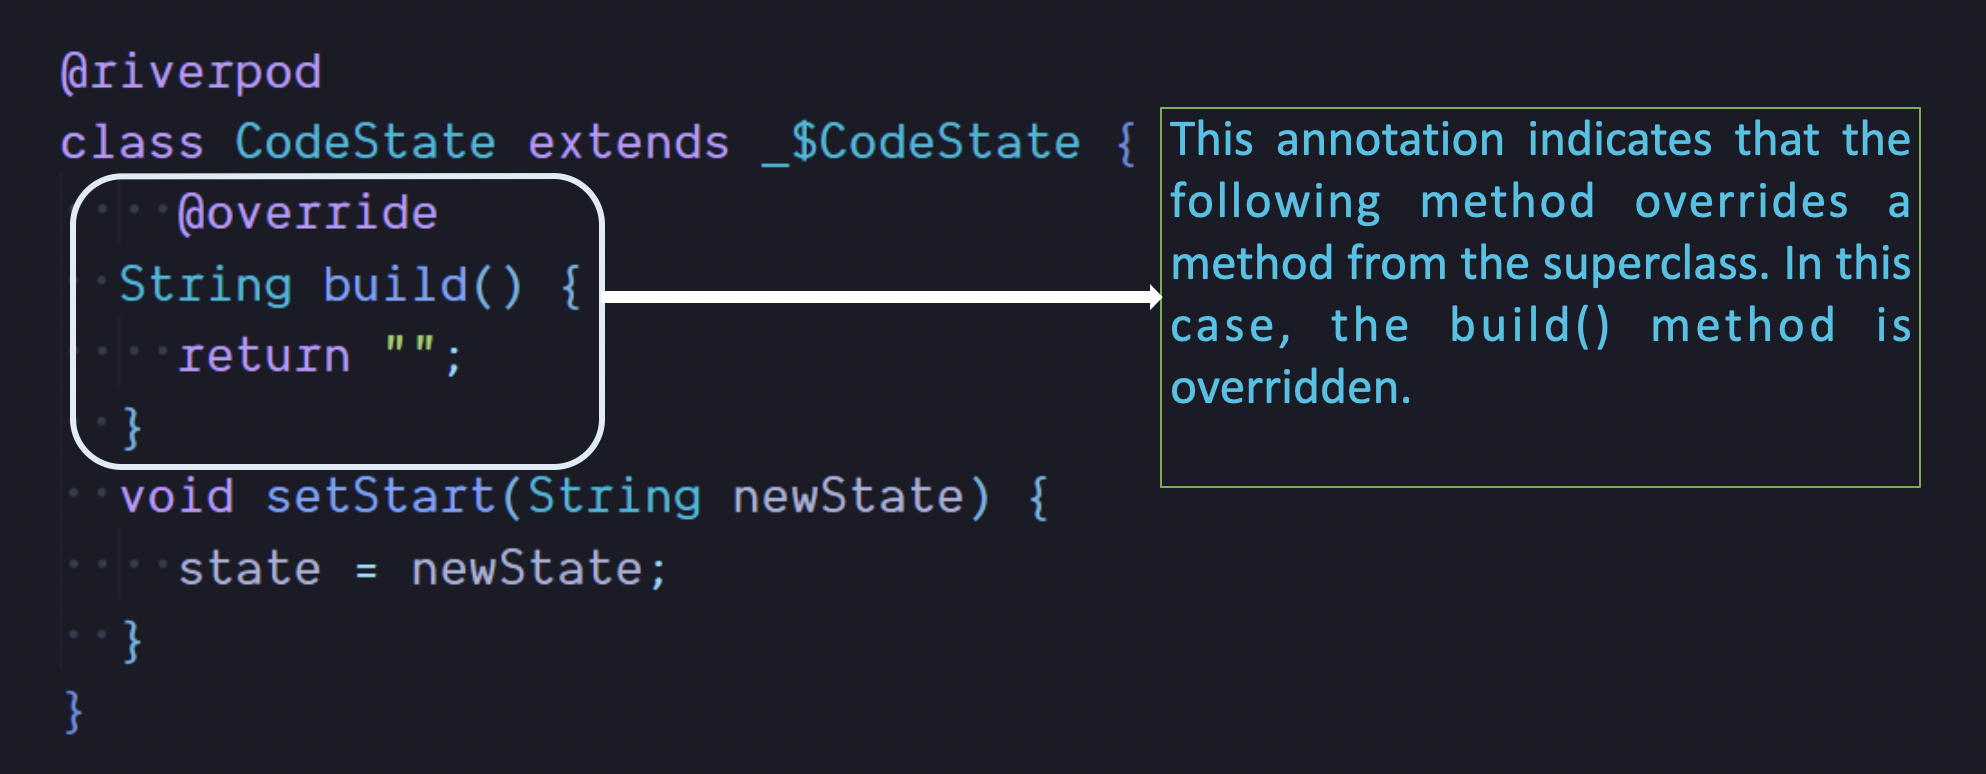
Pre look at Flutter Riverpod 2.0 from the above picture.
It also introduced another two new providers. Previous versions have seen six providers. You can still use the older version of Providers.
In this new version NotifierProvider and AysncNotifierProvider are encouraged to use more. Since the new version depends a lot more on the auto generation of code, we will first see how to auto generate Providers with a package name
riverpod_generatorGo ahead and install the plugin. At the same time make sure you install riverpod latest version at least equal to 2.0 or above. You may run the below command to do it
flutter pub add riverpod_generatorLet's take an example. Previously we could have a Provider like below
final stringLabelProvider = Provider<String>((ref) => 'Hello World');The above providers is manually typed in and you mention the provider type. Here we return a Provider which gives us a String.
Below we will see how to generate providers in Riverpod 2.0 using code generation tools.
Annotation & function name
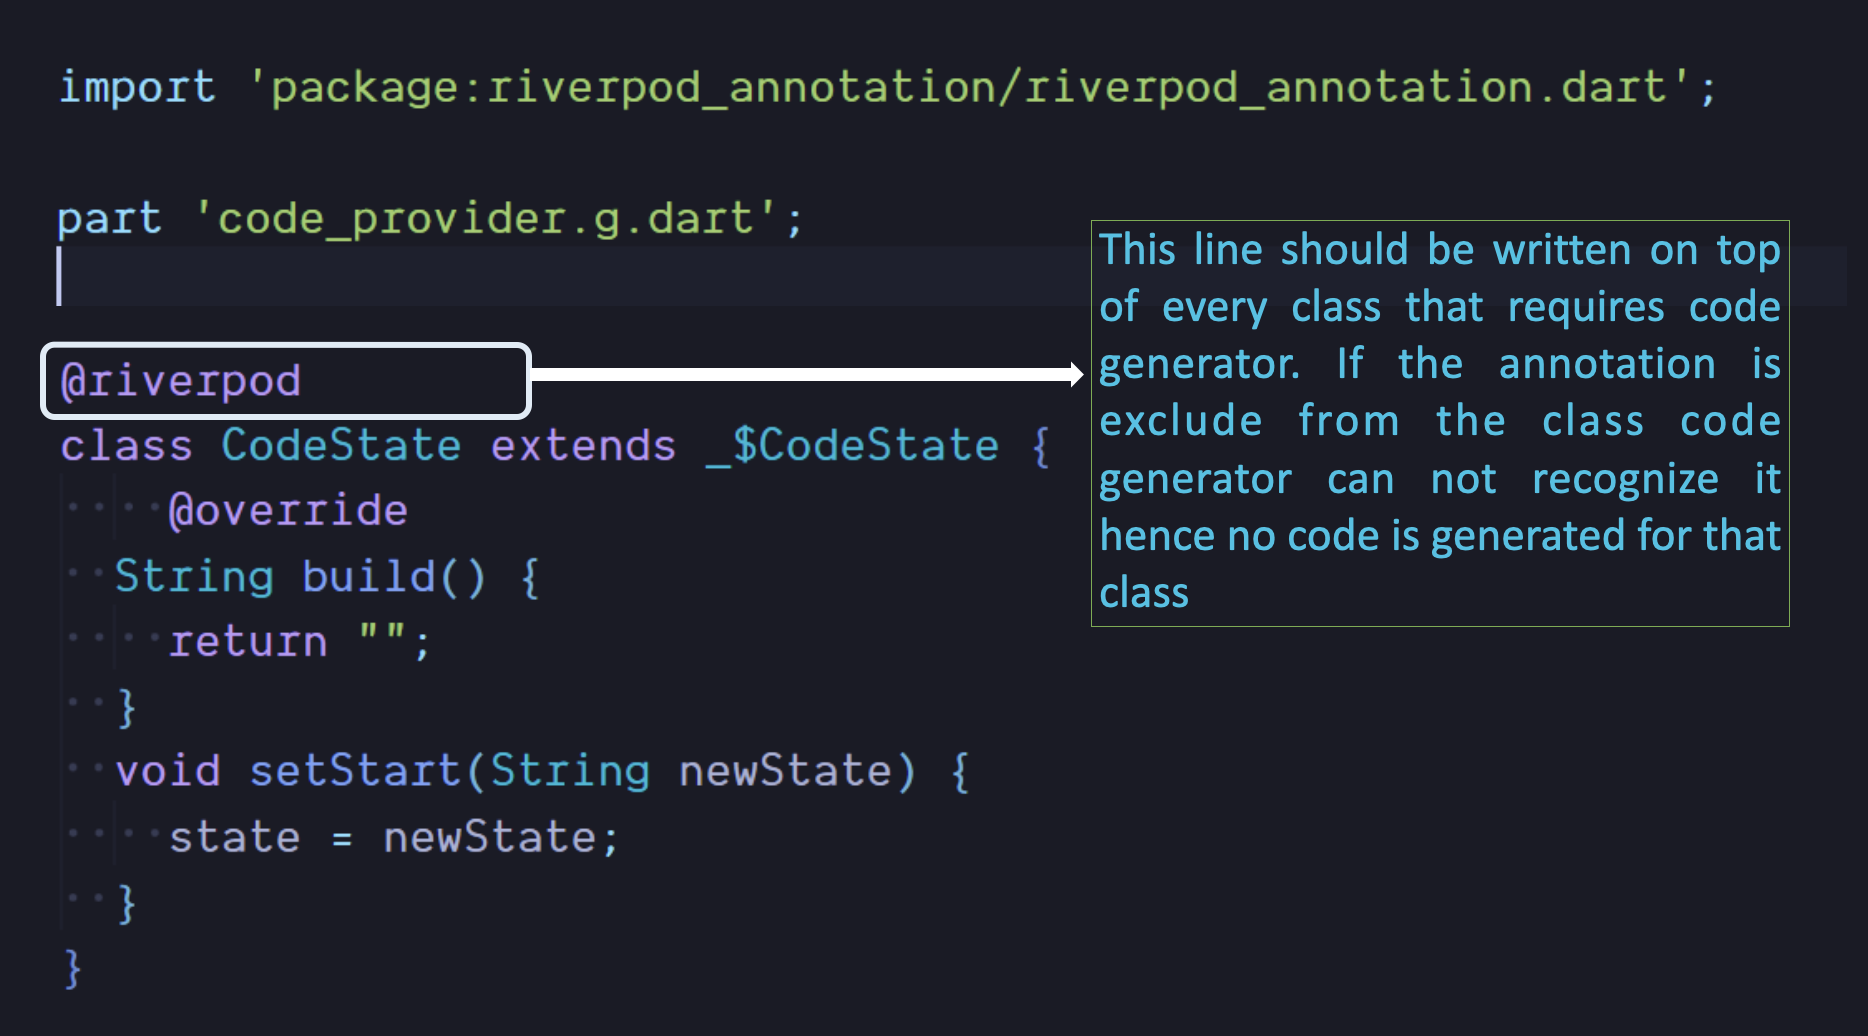
Now we do the same using riverpod annotation. It's a special syntax. It's like below
@riverpodWith this Flutter would know that, it needs to generate riverpod code. But how does it do it ? You need to give it more information, you need to provide it with a function.
@riverpod
String StringLabel(StringLabelRef ref)=>'Hello World of Riverpod';
make sure you import @riverpod annotation package file
The above one is a function that would generate a Riverpod provider. See the annotation at the top. With this kind of syntax you don't need to mention the Providers you want. Riverpod will auto generate the Provider for you. All you need to do it mention the return type of the function.

You should also know that you must mention a Ref type if you use a method to generate code for you. In our case StringLabelRef is a Ref type object. It is also the typedef for our provider. We will see more about it soon. This name has to be based on our method or class name.
In method name is StringLabel, so the ref object name is StringLabelRef with Ref at the end.
In the above case, we need a Provider to manage our String. So Riverpod will auto generate a Provider that will help us manage a String.
Even though it looks like there's more code write this time, but this is still cool since you don't need to mention the Provider type on your own. Previously it was confusing to mention since there are six types of Providers.
We are two more steps away from the auto generated code. You need to
√ mention where to put the auto generated provider code
√ run a special command to generate the provider
File path name
You need to tell riverpod where to generate the file and you need to give it a name. The name should be similar as your current file name.
In this case our function mentioned is in main.dart, so the auto generated file would be main.g.dart. You need mention at the top right below other imports.
import 'package:riverpod_annotation/riverpod_annotation.dart';
import 'package:flutter_riverpod/flutter_riverpod.dart';
import 'package:flutter/material.dart';
part 'main.g.dart';
You see we put the file name as part of our project and we put below other imports.
Run command riverpod code generator
At the top we have installed riverpod_generator and we need run the below command
This is the last step. We need to run a command to auto generate the code. The is given as below
flutter pub run build_runner watch --delete-conflicting-outputsfor the above command to run make sure you have installed the below plugin
build_runner:After running command look at the file below.
So now our main.dart looks like below
import 'package:riverpod_annotation/riverpod_annotation.dart';
import 'package:flutter_riverpod/flutter_riverpod.dart';
import 'package:flutter/material.dart';
part 'main.g.dart';

//final stringLabelProvider = Provider<String>((ref) => 'Hello World');

@riverpod
String StringLabel(StringLabelRef ref)=>'Hello World of Riverpod';

void main() {
  runApp(ProviderScope(child: Home()));
}

class Home extends ConsumerWidget {
  @override
  Widget build(BuildContext context, WidgetRef ref) {
    return MaterialApp(
      home: Scaffold(
        body: Center(
          child: Text(
            ref.watch(stringLabelProvider),
            style: const TextStyle(fontSize: 30),
          ),
        ),
      ),
    );
  }
}
The above code is ready to run.
Accessing Providers
You see how accessed the provider using ref.watch(stringLabelProvider)
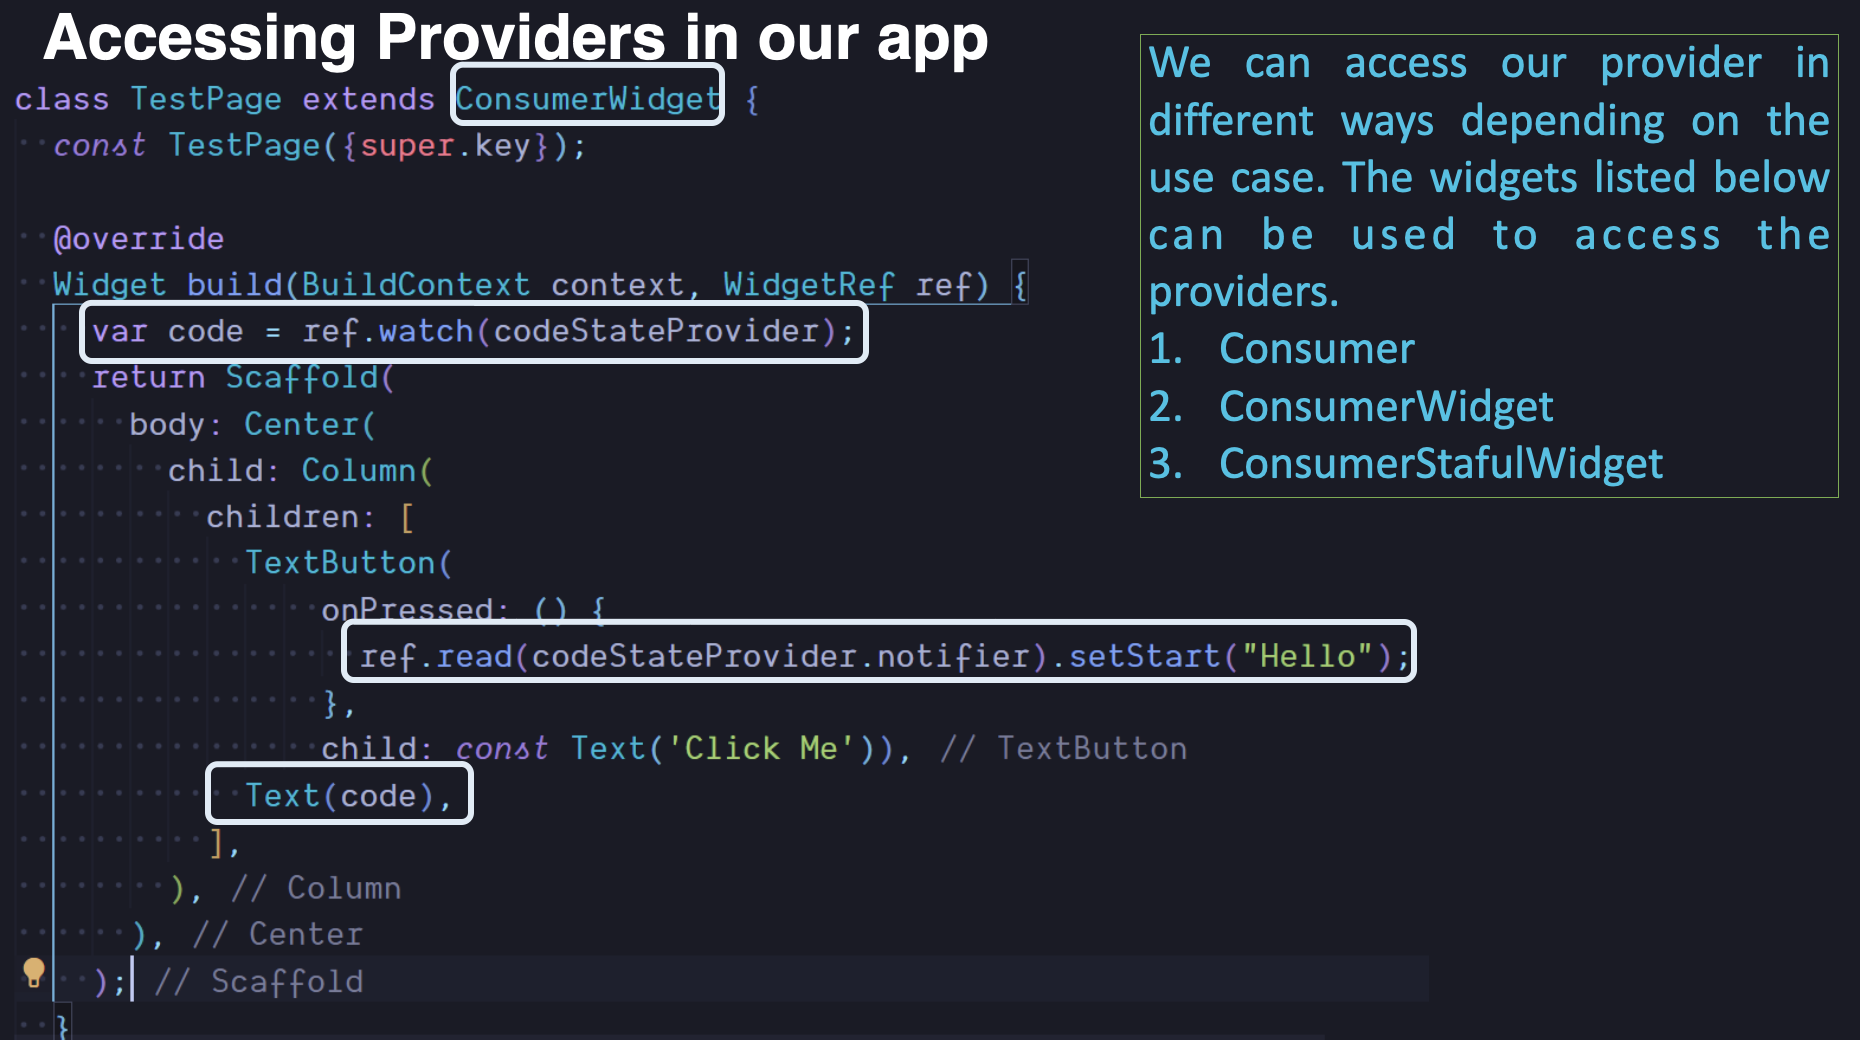
In general you need two to three things to access providers in the UI
√ ConsumerWidget or other related widget
√ ref.watch (gives you read only value)
√ ref.read (if you want to change providers values)
The below picture also gives you a clear idea about the accessing providers.
You will also see there's a main.g.dart in our lib folder. That file is scary, but you need to look at the bottom part of the file.

You will see the above code in the bottom of the main.g.dart. Here's a provider that's been generated for us and it's stringLableProvider.
The Provider stringLableProvider we used in our UI code. stringLableProvider is AutoDispose provider. It means it would be deleted automatically when not needed. Auto disposed means deleted from memory auto. Which also means you need to generate again when you visit this page or function.
NotifierProvider
This is a new provider, this one is supposed to replace ChangeNotifierProvider, StateNotifierProvider and StateProvider.
Let's see how to use Riverpod 2.0 NotifierProvider for reactive state and change state of the app. Here we will first create a class and our class would extend Notifier. Here we will do everything manually. You can still generate code using riverpod generator plugin
With Notifier you need to mention your state variable type. In this case we will have a string and it should be reactive. so we will mention it.
class NewStringLabel extends Notifier<String>{
  @override
  String build() {
    return 'dbestech';
  }

  void toCamelCase() {
    state = '${state[0].toUpperCase()}${state.substring(1).toLowerCase()}';
    print(state);
  }
}
Next we also have to override the build method. Build method should return String type since our Notifier return type is String. You may understand it the other way,
Since build method returns String type, Notifier should return String too.
At the same time, we have a method name toCamelCase(), we will call this method using our Provider.
And after that we need to expose our state to the outside world.
We will do that using NotifierProvider. NotifierProvider would take our custom class and Notifier type.
final newStringLabel = NotifierProvider<NewStringLabel, String>(NewStringLabel.new);
Previously you would have done it using Provider, StateNotifierProvider or StateProvider.
See the complete code for this example.
class NewStringLabel extends Notifier<String>{
  @override
  String build() {
    return 'dbestech';
  }

  void toCamelCase() {
    state = '${state[0].toUpperCase()}${state.substring(1).toLowerCase()}';
    print(state);
  }
}
final newStringLabel = NotifierProvider<NewStringLabel, String>(NewStringLabel.new);

void main() {
  runApp(ProviderScope(child: Home()));
}

class Home extends ConsumerWidget {
  @override
  Widget build(BuildContext context, WidgetRef ref) {
    return MaterialApp(
      home: Scaffold(
        body: Center(
          child: Consumer(
            builder: (context, ref, child) {
              final String val = ref.watch(newStringLabel);
              return ElevatedButton(onPressed: (){
                ref.watch(newStringLabel.notifier).toCamelCase();
              }, child: Text(val));
            },
          ),
        ),
      ),
    );
  }
}
If you have list of objects like custom objects, String or integer, you may still use Notifier and NotifierProvider. Your Notifier may return list of objects. In our below example we return list of Strings.
class StringGenerator extends Notifier<List<String>>{
  @override
  List<String> build() {
    // TODO: implement build
    return [];
  }

  void addString(String randomStr){
    state = [...state, randomStr];
    print(state.length);
  }

  void removeAtString(int index){
    state.removeAt(index);
    state = [...state];
  }
  void removeString(){
    state = [];
  }

}

var strNotifierProvider
= NotifierProvider<StringGenerator, List<String>>(StringGenerator.new);
Like in the code, we have addString(), removeAtString() and removeString(). They all operate on Strings using state object.
Our state object is held by Notifier class. And this notifier is exposed to the UI using NotifierProvider.
Working with List
In the above example, we have seen how to work List. That was a simple List. Here we see another example of working with List and Providers with a model.
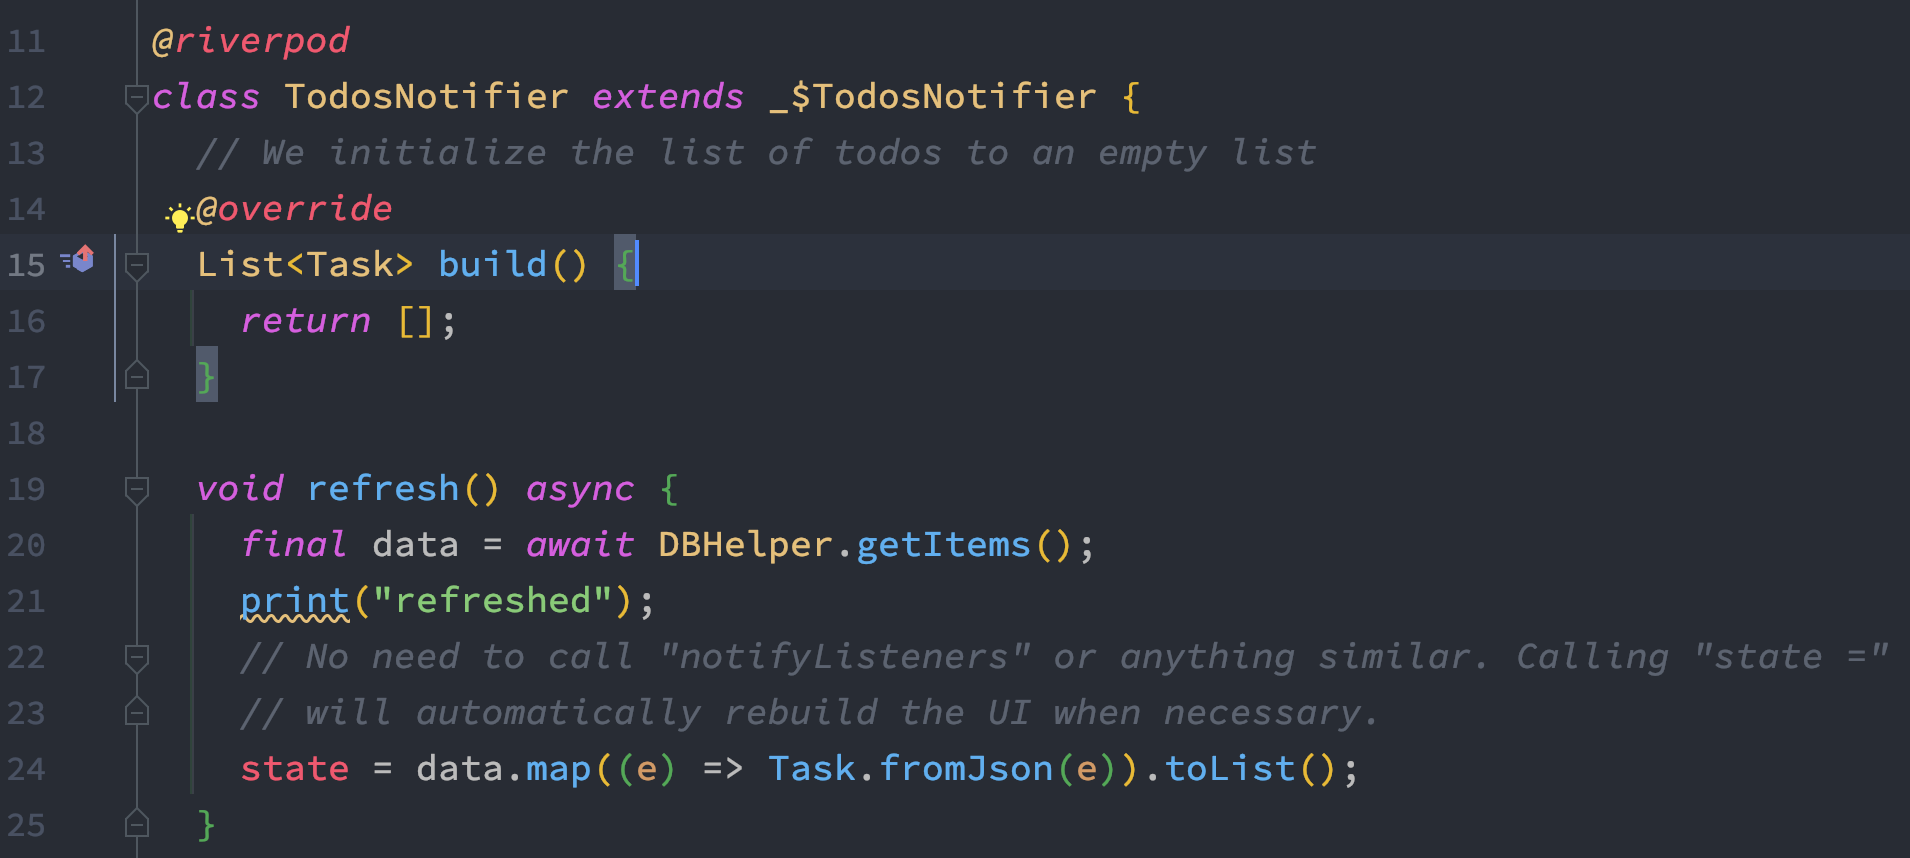
Here inside we are returning a List inside build() method. Here this method is returning a List which is a Task type. Task is model class.
We also additionally created a method on name refresh() which is called from the from UI, so that we update the list with new values. In this case we are using data variable which gets data from Sqlite.
We also need to take care of the state variable which should be updated at the end.
Now we have generated this list, using code generation.
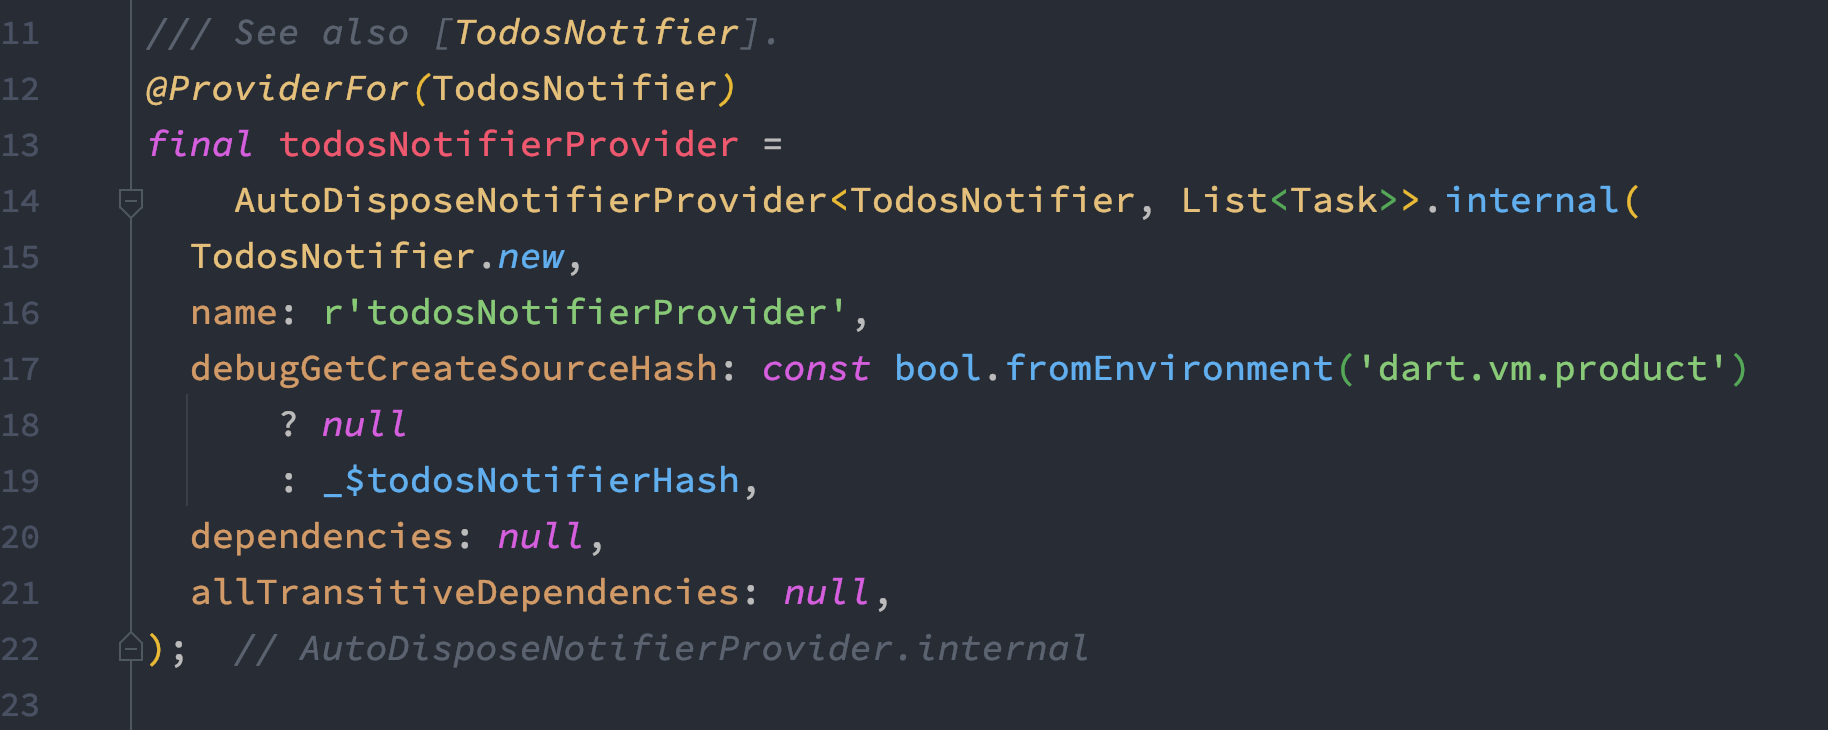
In the above code we see, todosNotifierProvider is our Provider. At the same time we also on line 14, List<Task> which is List type.
From the UI we can access todosNotifierProvider and related method like refresh().
Working with Boolean
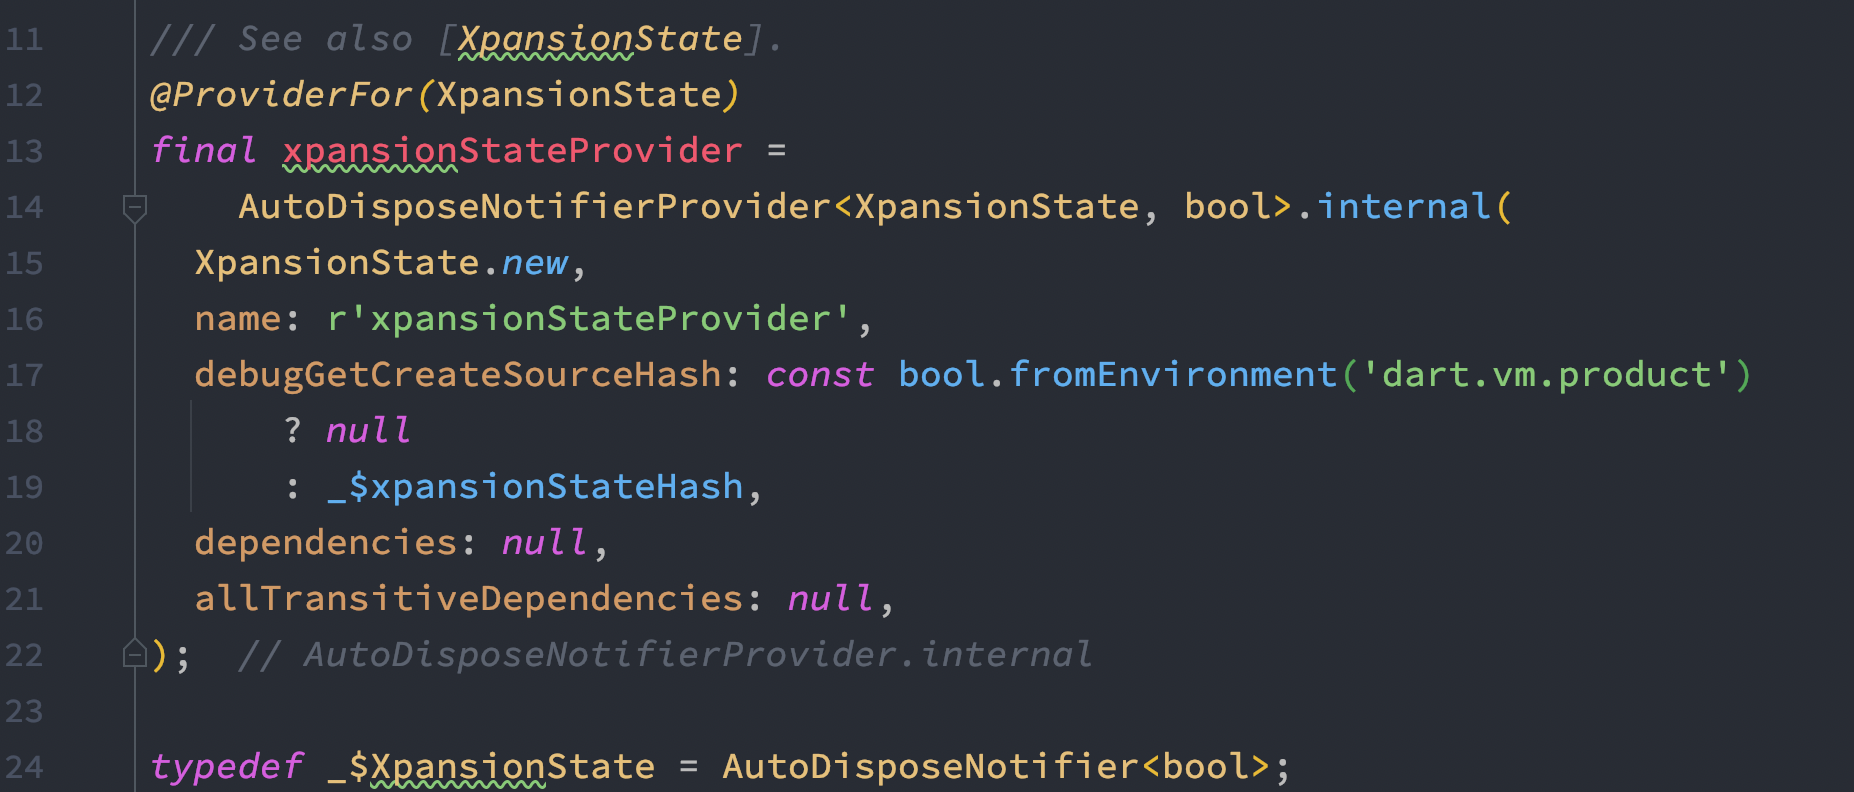
Let's cover another common concept of Riverpod state boolean variable. Just like dealing with String, the return type of build() defines it. In the case our build() method should return a boolean type.
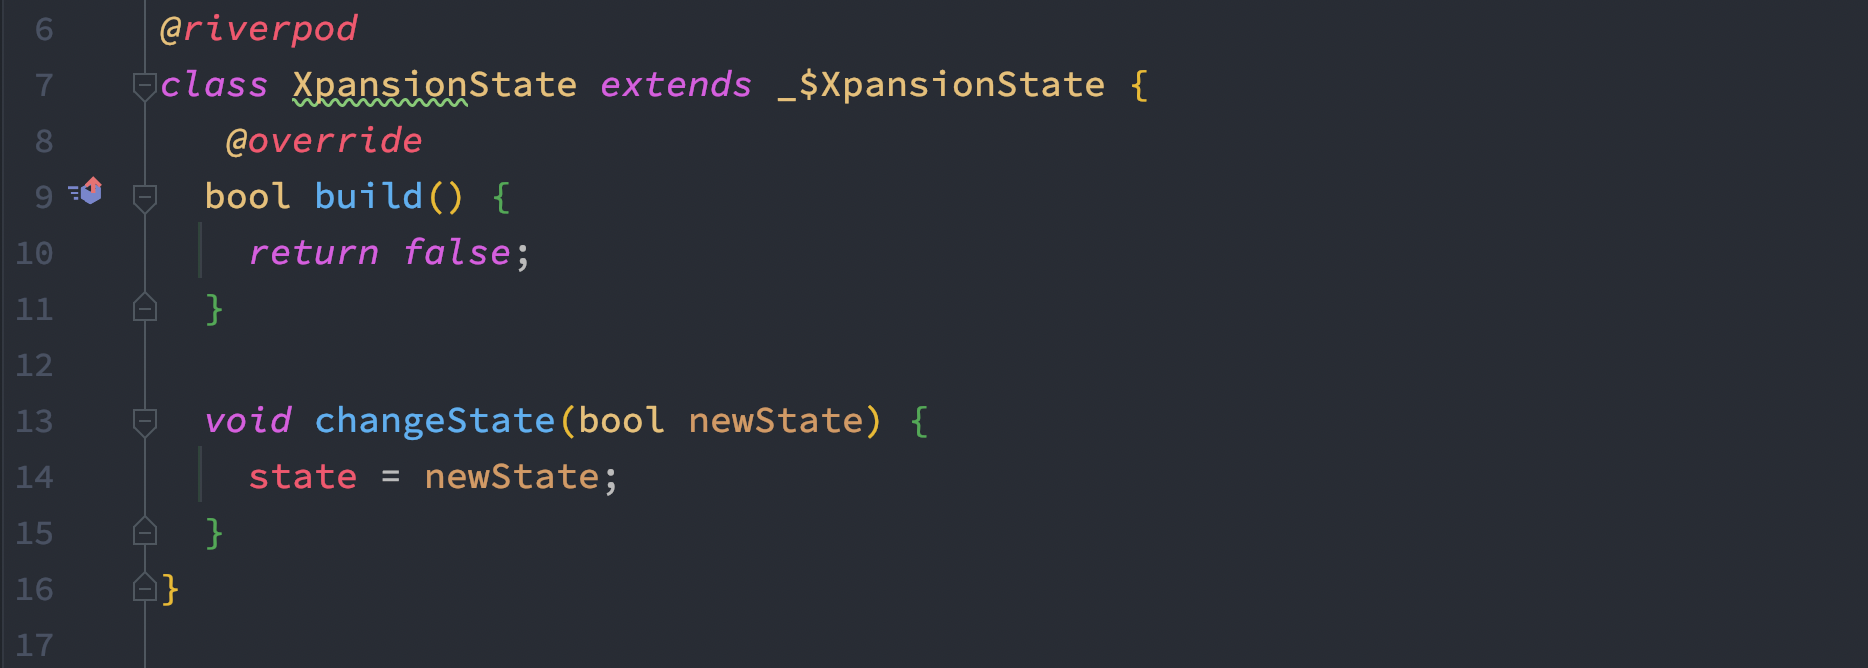
Look at the generate provider for boolean type from the picture below
Pass WidgetRef
Say you have a controller and you need to pass WidgetRef object globally to the controller and use the context of the ref object? How would do it? Actually it's easy. Every controller needs to be initialized.
Since controllers needs to be initialized, you may create a constructor of the controller and pass WidgetRef object from the UI and use it.

See how I am initializing and passing the ref object to the controller. Now we would be able to grab the ref object in the controller.
Let's see how to get it on the controller
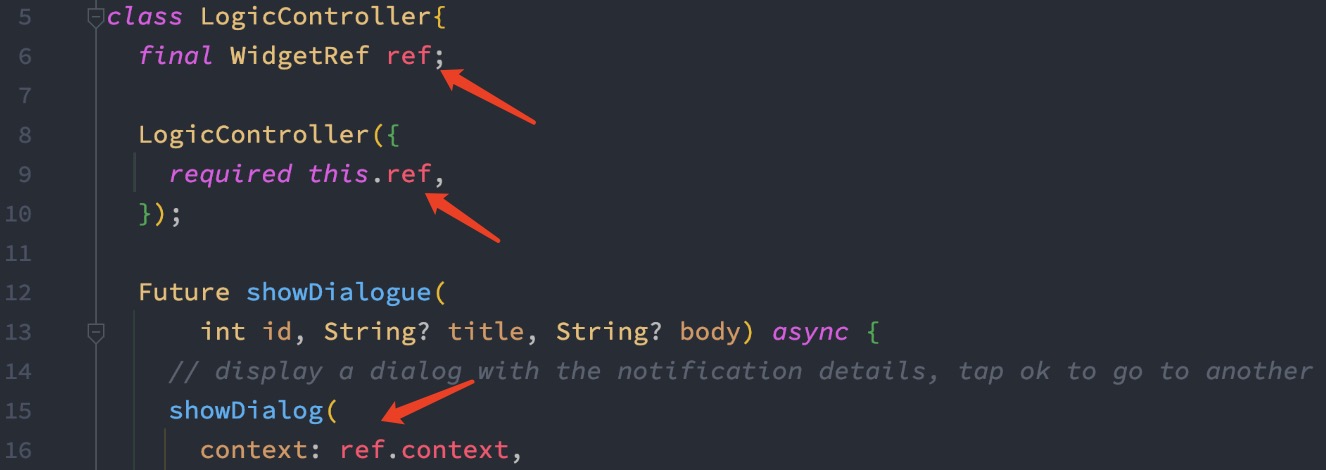
See how I accepted WidgetRef in the constructor, and use ref.context inside showDialog.
Riverpod notifier
We are also able to see notifier object with the latest Riverpod. Notifier object works with ref.read() method. Of course inside ref.read() we need to pass a provider.
From the provider object we can call notifier
The purpose of using notifier object with provider is to invoke a method of the provider and set changes. Because of notifier object, our state object becomes reactive.
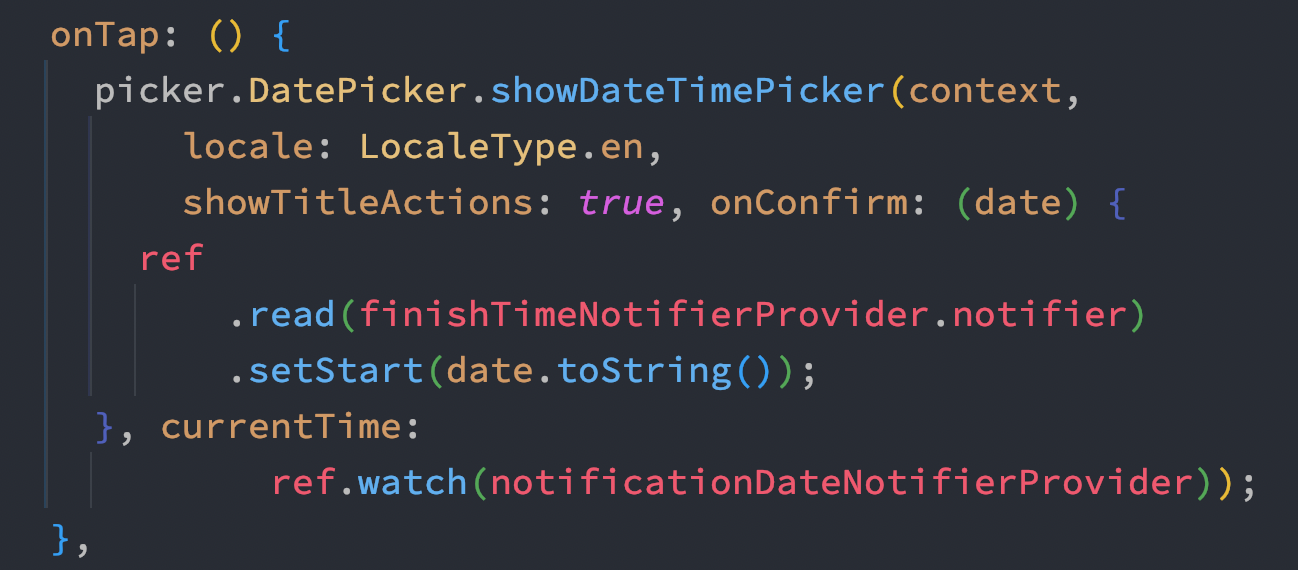
From the picture above, it's obvious that ref.read() and notifier object work together. And we are also invoking a method name setStart(), you may call any method inside the Provider class.
At the same time, see the last line, we see ref.watch(). There's not notifier object.