Here we will focus for the e-commerce templating part. We will learn how to set up configuration and little changes make the app reusable for various purposes.
This article is for those who bought the code. You could learn here how to set up the app in your local environment as well in a server and make the related changes. Here you will learn how to do complete customization.
Install android studio
First you need to have android studio installed in your local machine. Watch the video below to know about how to install android studio and flutter in your machine.
After installing android studio, you can just open the downloaded app file in the android studio. Just drag and drop on the android or vscode icon.
Deploy locally
Let's how to see install the downloadable code locally. Make sure you have flutter installed with latest SDK. As of this, the downloadable code is the latest version(3.4). Watch the video how to deploy locally
As you try to deply locally do ADMIN_HTTPS=false on the .env file of the backend code. On the real world server you should deploy it as ADMIN_HTTPS=true. And then run the below commands
First two commands are always useful if change .env file or change routes.
Also make sure the base url in the front end code

Once again make sure you have all the steps correctly
If you want to access the admin panel try following steps
If you still get error watch this video
Run with dbestech
Once you have installed the app locally, you may test with dbestech live url. You may run the app without any change, just in app_constants.dart file for BASE_URL you may set https://dbf.dbestech.com
You need to follow the below videos in order to set up everything correctly.
Change your project name
First thing you wanna do is to change the project name. You should change it as per your need. Watch video below to change the project name. This change project name method applies to any flutter projects.
Change app package name
Here you will learn how to change your app package name. This package name change is a must. Without this you won't be able to submit your in the app store. If you don't change the package name, it will conflict with other developer's package name.
Change app name
You should change your app name. Watch video how to change the app name. App name a lot of time goes with package name or bundle identifier.
Change app logo
Since you are publishing your own app, it should goes with app logo. Learn how to change the app logo.
Firebase project set up
Since this app depends on Firebase you have to create a Firebase project and get the GoogleService-info.plist for iOS and google-services.json for Android. The below video shows to create a Firebase project for android.
Try without phone number verification (commercial licence)
Here in the video you will learn how to try it without phone number verification.
Twilio phone number verification (commercial licence)
Here we used third party twilio to phone number verification. See the set up here.
Google OTP
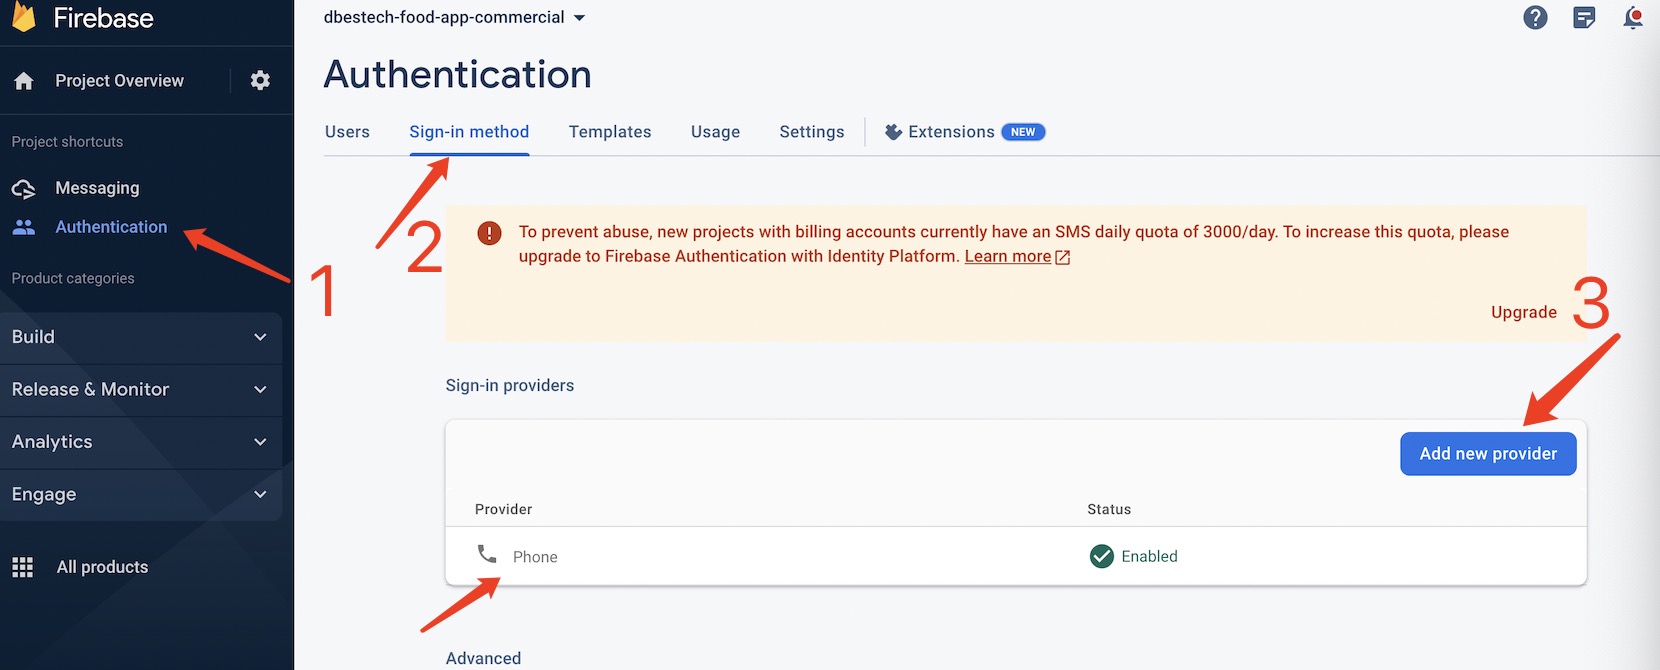
With the latest update, you may also use Google Firebase OTP for login. All you need to do enable phone login as provider in the firebase console.
You must make sure you have connected your app with firebase
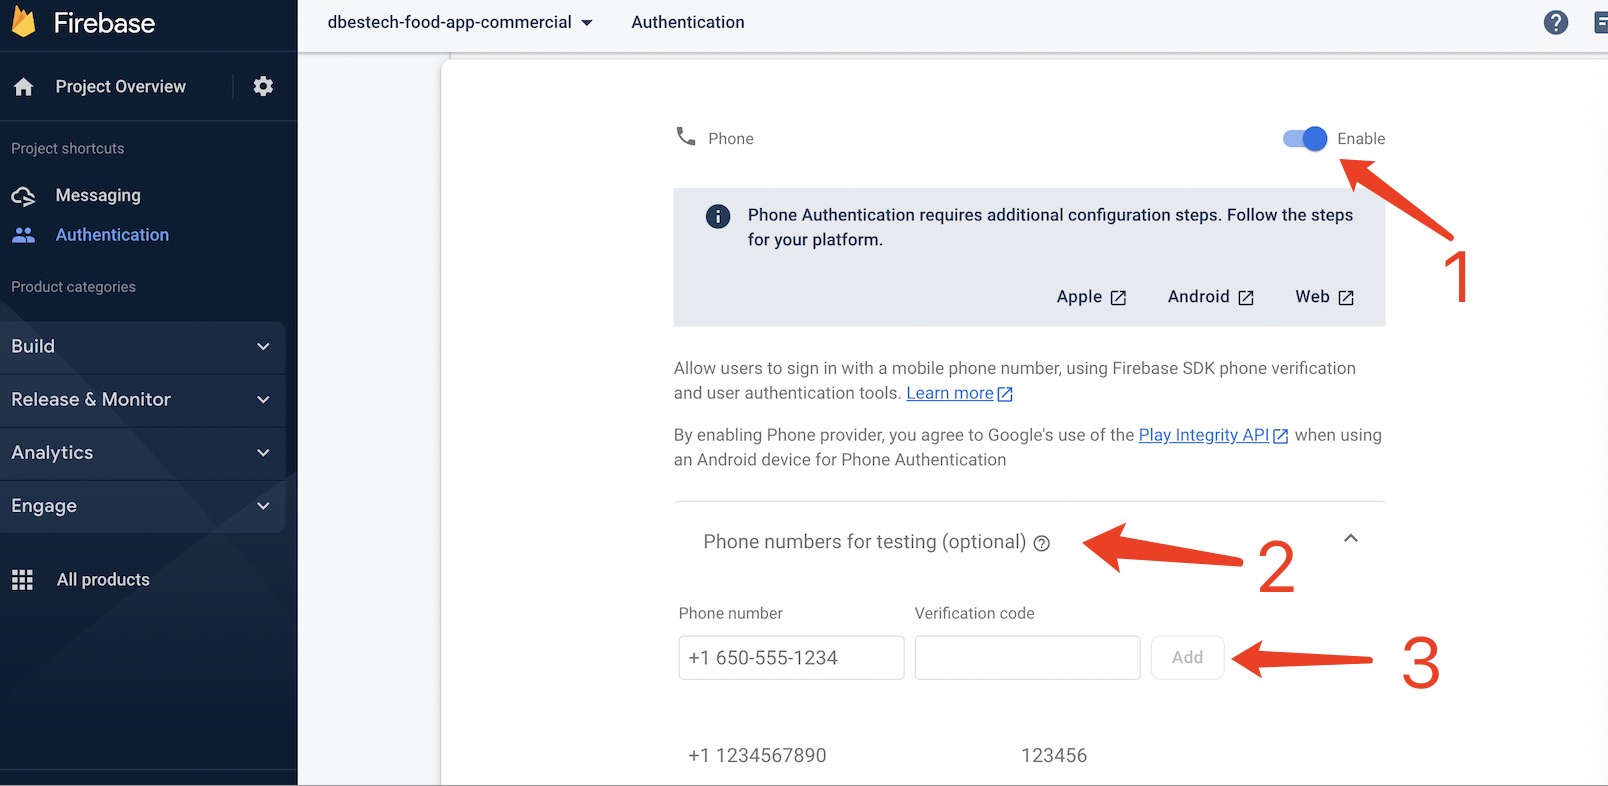
See the steps below. The below picture shows how to enable phone number as sign-in method.

Once you enabled authentication, then you need add phone number with country code. You may also use dummy numbers

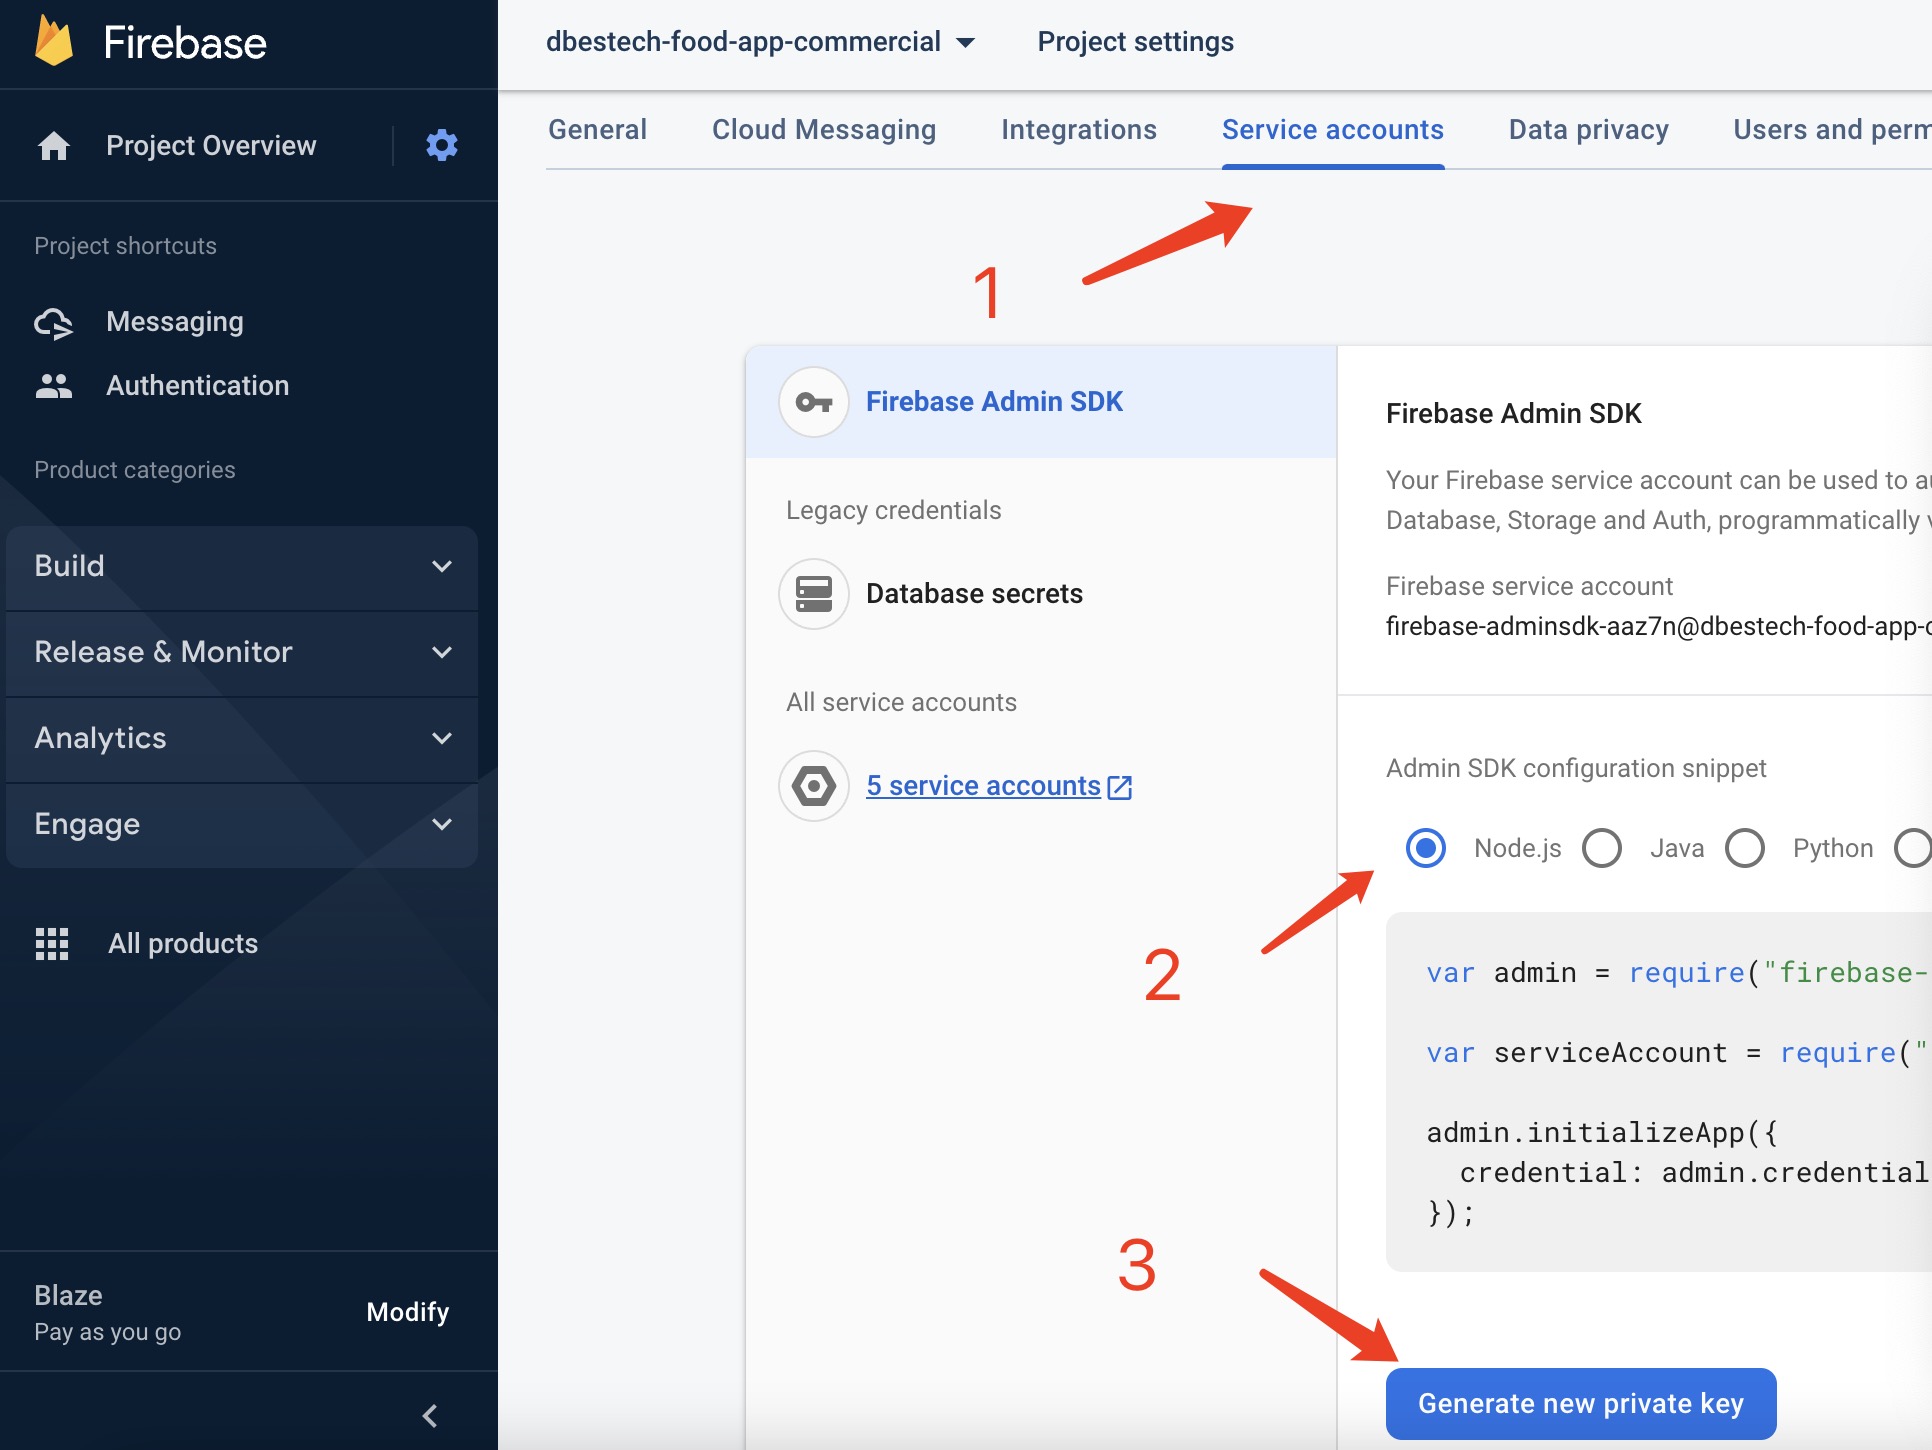
You also need to download the json file from the firebase console and drag and drop in the root of your laravel application.

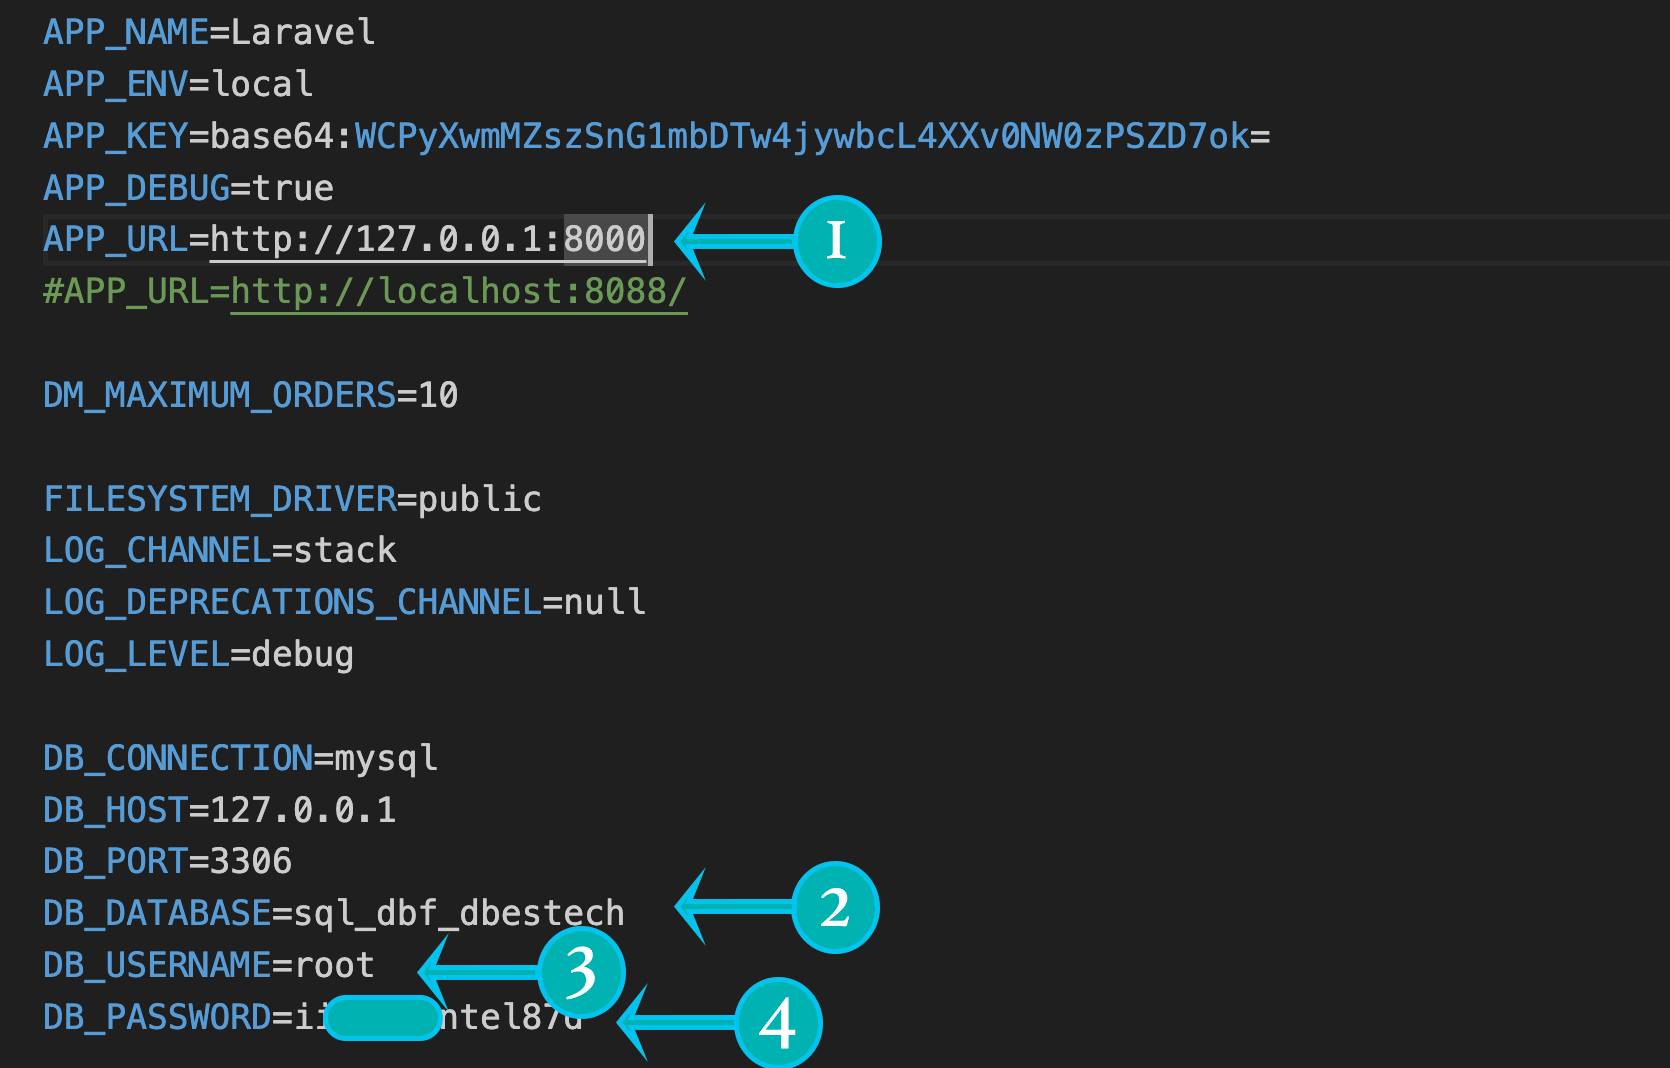
Then you need to mention this in your .env file as well
Google Map api key
Since this app depends on Google Map, you have create a billing account in and create project there to get Google Map api key.
https://console.cloud.google.com/
If you want to view Google Map in the project you must set up your own account in the above link and create a project.
Android users should put the key in the application manifest android/app/src/main/AndroidManifest.xml
iOS user put the key ios/Runner/AppDelegate.swift
import UIKit
import Flutter
import GoogleMaps

@UIApplicationMain
@objc class AppDelegate: FlutterAppDelegate {
  override func application(
    _ application: UIApplication,
    didFinishLaunchingWithOptions launchOptions: [UIApplication.LaunchOptionsKey: Any]?
  ) -> Bool {
    GMSServices.provideAPIKey("YOUR KEY HERE")
    GeneratedPluginRegistrant.register(with: self)
    return super.application(application, didFinishLaunchingWithOptions: launchOptions)
  }
}
SHA1 Key
You need to get SHA1 key for android Google map.
Easiest Google Map setup
This could be the easiest way to set up google map with your Flutter app. All you need to do, just connect your billing card and then get api key.
Place order notification backend
Here you will learn how to place order and get backend notification and show a pop up page for the order. It's based on firebase service as well
Install the backend locally on windows
It shows how to install the downloaded backend in a local windows machine. Just follow the steps to do it.
Install the backend locally on Mac
It shows how to install the downloaded backend in a local Mac machine. Just follow the steps to do it.
Hosting on Hostgator
If you wanna host the app in live server watch the video below
Learn to integrate with Paypal
Here I step by step showed how to get a Paypal secret ID and client ID for your app to work with Paypal payment. Here I also showed how to create test account both for marchent and users.
Access localhost from outside
Here you will see how we can use ngrok to expose our localhost to outside world. Ngrok works like your domain. It's free and expose locally hosted server to the outside world.
Web push notification
If you want to enable web push notification on place order from the client side, then we need to do basic firebase set up. Make sure you have already basic firebase project set up. In this section, you need to create firebase projects for web application. And then get the SDK info and vapid key info and use them in our code.
Recommendation
Strongly recommend to watch and finish the video below. The below video teaches you to build admin panel step by step.
Hosting on Namecheap
Select service zone
Learn how to choose zone for your business
Enable iOS push notification
You should watch the below video if you wanna enable iOS push notification. You just follow the set up but not the coding part. Just follow the different set up for the apps.
Upload APNS for iOS Firebase
Additional Tips
The below tips helps you to learn more and better grasp for the app.
1. Google Map Api Key Test With Postman
2. Postman push notification test
3. Firebase cms token and getx null
2025-01-22 09:45:45
i
2025-01-22 09:45:44
i